This project started from wondering what would happen if various features could be combined from 1861 Civil War and Thoran's Civil War Between States plugins. After much deliberation and obtaining permission from the authors of those fine plugins, Blue & Grey was born. Development has taken well over a year involving countless betas, in-depth research, use of new features offered by Myth II v1.4 and modelling of many new units. The final result is a plugin that has the authentic feel of 1860s warfare while providing real depth of gameplay and many tactics for skilled players to master.
Version 2.0 fixes a few bugs in the v1.0 meshes, and most importantly it separates between the levelpack and the tagset. You can use the Tagset plugin on any mesh that uses Bungie units. Gameplay will be the same as with the Levelpack maps, however as scripting is needed to make the artilleryman/cannon behaviour work you will not see this happening on other meshes. Instead, a weaker cannon will replace fetch and warlocks, and artilleryman will have an unlimited supply of grenades.
If, however, you already have the initial Blue & Grey release and have downloaded the updater zip, this is what you do:-
|
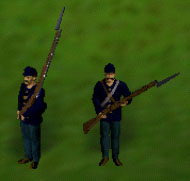
Soldier. This unit shoots a minie ball together with buckshot a reasonable distance from a smoothbore musket, inaccurate and niggling at long range but deadly up close. They have to reload after firing, a lengthy procedure as their weapons are muzzle-loaded. During a fire fight they'll do this automatically unless the enemy is too close, and you can make soldiers reload at any time by pressing 'T'. You can interrupt their reloading by taunting ('U'), however unlike soldiers in the 1861CW plugin, these will still have to reload before being able to shoot again. While crouching their selection boxes shrink, giving them some protection especially if behind stone walls, and allowing units behind to shoot over their heads. Their bayonets give them some defence in close, but if isolated or out of formation they are easy prey for cavalry. Soldiers can be made to bayonet-charge the enemy by holding Shift and Control (in that order) when clicking on enemy units. |
|
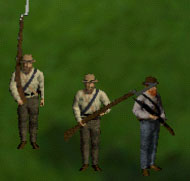
Conscripts. New recruits with next-to-no battle experience, many of whom have never fired their muskets before. With fresh legs they move faster than veteran troops, but are far slower to reload and fire and are lucky to hit a target the size of a barn door. In large numbers on a bayonet charge (Shift/Control/Click on enemy) they can quickly overwhelm an unprepared enemy, as their speed increases substantially when they break into a run. Be wary of sending these units out on their own, as their short-sightedness leads to their easily being ambushed and slaughtered. |

|
Officers. Officers see further than any other unit except Mounted Riflemen, so they are valuable in protecting your troops from ambush. They also have the ability to 'heal' soldiers by delivering a morale-boosting speech. You'll not have too many of them, but at the right time & place they can turn the tide of a battle. |

|
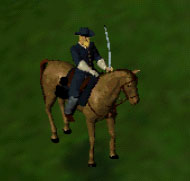
Mounted Riflemen are an invaluable resource. Only bettered in speed by Cavalry, they can quickly traverse the countryside and provide valuable
intelligence into enemy movements with their extreme far-sightedness. They defend themselves with a carbine at long range and pistols up close, and can quickly eliminate an unprepared enemy force or just as quickly be killed by one that is expecting their attack. |
|
Cavalry. These horsemen fly across the battlefield and plunge into battle, firing rounds from their revolvers and cutting down anything they meet with swift strokes of their swords. Few in numbers and expensive to lose, cavalry can nevertheless terrify slower units caught alone in open country. Nothing hurts more than pressing home a victorious charge only to see a strong cavalry force slicing your flanks to shreds or sabring your cannon crew. Hint: To make these attack without using their pistols, use Shift-Control-Click as with soldiers. |
|
Sharpshooters were often at the forefront of an army, forming a skirmishing line to harrass the enemy. Carrying breech-loading Sharps rifles, they are accurate from a long distance and have a quick rate of fire. Unlike other soldiers, these have no in-close melee protection and are a little slower. Historically they had bayonets and were in fact elite troops in every respect, however I feel that their range and rate of fire give them sufficient power in-game. |
|
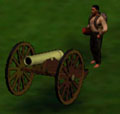
Cannons and Artillerymen are heavily scripted, which is why Blue & Grey is not available as a tagset for standard Bungie maps. Artilleryman are automatically assigned to a cannon which they'll follow around the map. Cannons are very tough to destroy, but if their artilleryman dies then the cannon becomes just a hunk of useless uncontrollable metal. The first lesson to learn then is not to target enemy cannon but the guy behind them. Ok, so your cannon is being run down by enemy cavalry and your infantry is too far away to help ... if you're quick, taunt your cannon. The artilleryman will then be free to run away to safety, then return and taunt near the cannon to reactivate it once more. Unfortunately, you cannot capture enemy cannon this way as there is only so much Myth is capable of. Artilleryman may look like the "Keg Throwers" of Thoran's plugin, but are way less powerful. They carry as their only defence a limited supply of primitive grenades, which dud more than they explode - but when they do detonate they can start fires. Cannons themselves are unlike most other cannon in Myth, in that they fire shells at a very flat and fast trajectory. You have to take care to ensure they have a clear line of fire, else you'll just be wasting ammunition. Their distance attack is explosive shells with a close radius of damage; within musket range however they fire a deadly hail of canister shot. Their special ability is twofold:- click on the enemy or the ground and it will fire solid shot, which can bounce through enemy soldiers sending them flying like ten pins. If you hit T then click on the cannon itself, it will blow up taking any close units with it. Both special abilities require full mana to use. |
There were two additional maps that could not be readied in time for release - look for another Project Magma plugin for Blue & Grey in the not too distant future.
Using Terrain: When soldiers kneel to reload, they only present half the target area as when they're standing. Therefore if you line up your men behind a rockwall or a crest of a hill, enough so they can just shoot over it, you'll often find that you can score hits whereas your enemy will waste their bullets hitting the wall/hillside. With cannon this is even more important - they don't lob shells high like most cannons in Myth do, so you have to make doubly sure they aren't obstructed in any way when you're setting them up.
Using Reserves: This applies particularly to infantry. Don't move them all around as one mass and tell them to charge all at once. If you do, its very hard to pull them out or to respond to events once the battle has been joined. You could be flanked by cavalry or another enemy infantry force and have nothing to counter it with. If, instead, you divided your infantry into a main "strike force" and a secondary reserve about half a gunshot length behind the 1st group, you've got the ability to survive surprise attacks if they happen. Also, you can send them around to flank an enemy in order to force a win.
Cavalry: The easiest way to kill cavalry is to send them against a line of enemy troops that isn't already engaged in battle. Even if their controlling player isn't taking notice, generally they'll auto onto your cavalry and make a mess of them. Instead, hold them back as long as you can. Look for cannons that don't have infantry guarding them & sabre the artillerymen. Look for opportunities where enemy soldiers are busy in a shooting war, then try to hit them from behind (though to the side a little).
Remembering to charge. Often I've seen players tell soldiers to attack an enemy group at max range when time is critical. That's a slow way to kill the enemy, and a sure way of not getting to a flag in time. Remember that minie balls do more damage up close, so if you've got superior numbers tell your men to move closer before they start shooting. And get used to using ctrl-shift-click to make them bayonet charge, as often that can catch other players off guard and make all the difference in a battle.
Play-testers: Baak'lor, BlackAngel, ChrisP, Coggs, Discordia, Doobie, Grignard, Infininight, Khellek, lank, Malek, Mate, Mauglir, Nae'blis, Remedial, Savanarola, SharpCuttingSword, theBruce, Wismuth, woof. I apologize if I've forgotten anyone.
To Thoran and Cydonian, a heartfelt thankyou for allowing me to build on your excellent work.
Project Magma recognizes the pre-existing rights and responsibilities of Bungie Software Products Corporation. Portions of this plugin made with Fear, Loathing and other Bungie products remain under the prior licence agreements for use of those products.
Back to the Blue & Grey v2 Download Page