Loathing Documentation v1.8.0 Fear Documentation v1.8.0

Section I: A Brief Introduction to Fear

Introduction
"Hmm, I wonder how large of an explosion I can make..."

For many of us, this was the question that started us down the dark path of playing with Myth's tags. The innate desire to cause as much destruction as humanly possible. No more than a month after Myth: The Fallen Lords shipped, people were using hex editing tools to create lightning shooting archers, gigaton wights, and dwarves who could create some absolutely mind bending carnage.

Of course, after a little while, many of us mellowed out a bit and started playing with other things. And although we were still using hex editors and some basic, third party editors, we managed to create some awfully nifty stuff. I still vividly remember the first time I witnessed the seemingly mundane glory of a barrel exploding into a plethora of dwarf heads. Hey, nobody else had done it before.

Now, instead of figuring out the difference between the hexadecimal digits FF and 00, we have Fear. Fear is kind of like every Myth editor's dream application, a straightforward program that finally lays bare things people sacrificed months to decipher, often unsuccessfully. There are literally hundreds of things that were never understood, never uncovered, and never even suspected that Fear now lets us play with.

Things with names like Initial Z Deviation and J Component of a Wobble Phase Multiplier. Scary, eh? Think of this document as a dictionary. It contains explanations for all sorts of things you might have never understood, and definitions for all sorts of things you probably never cared about.

It is also, coincidentally, the kind of thing that only a masochist will sit down and read in one sitting. The whole idea behind this document is to teach you the basics, and then provide a reference that you can fall back on when you don't understand something. Flip to the section you need to read, and ignore the rest. You don't, after all, read the entire M section of a dictionary when trying to figure out what masochist means, do you?

So, now that you've slogged through that, it's time to start playing. Like meaty morsels dropped in a pool of piranhas, Fear and Loathing are going to stir up the waters a bit. Let the games begin.

Introduction to NEW Features
"Hmm, how about we make that explosion 3 times larger..."

This document has now been updated to describe features offered in the latest version of Fear. Look for sections in italics and especially passages marked with a big red *NEW* to see what's changed. Features introduced in version 1.7.0 and higher (but older than the latest) will be marked with the version number that introduced them for reference purposes.

What Fear Does
Fear is a tag editor. It edits simple tags, complicated tags, tags of all shapes and sizes (with the exception of a few tags that it doesn't like).

Fine. So, what's a tag?

Myth II uses small data structures called tags to store all sorts of information, from models to sounds to collection. Simply think of them as data files for Myth, and you should have no problems. Tag files come in three varieties: single tag files, monolithic tag files, and plugin files.

The single tag files are just that, a single tag contained in a standalone file. These files are found in the local folder, inside sub-folders that organize these files into their respective types, such as projectiles or monsters. Standalone tags, when placed in the right spots, override or are added to existing tags found in the monolithic tag files.

Monolithic tag files are simply collections of tags neatly wrapped up in a single, easy to handle file. Since Myth II uses several hundred tags, these files are both easier to manage than hundreds of single tag files, and waste less disk space. The only problem is that no changes can be made to these files; you'll see why in the Saving Tags section. Instead, the tags contained within these monolithic tag files are overridden by single tags in the local folder. This way, you can make changes to these small, external files to your heart's content, but you will always have a clean version waiting to back you up.

Plugin files are kind of like miniature monolithic files that are generally used to organize and distribute the tags you have created. When you build a plugin file, all of the tags in your local folder are gathered up, neatly labeled, and placed in your plugins folder. You can then distribute these files, which often contain new maps but can be used for just about anything. When you tell Myth II to activate a plugin containing mesh tags, any changes to units or physics or anything else will only affect those contained meshes. Any tags that don't contain meshes (often new or modified units) will affect all maps and meshes, so be careful what you enable. Finally, keep in mind that you cannot edit a plugin file--the tags contained within plugins are not loaded by Fear. You will have to edit your original tags as standalone tag files, and then (once they're finished) build a new plugin.

Back on topic, what Fear does is edit these tags. Since tags are broken down into different types, Fear has different editors for each flavor of tag. For example, a monster tag is very different than a mesh tag. If you tried to edit one with the other's editor, you'd wind up with interesting (and very disappointing) results. When you open a tag, Fear automatically loads the correct editor, and you can go right to work.

By editing tags, you can change almost anything in Myth. Seriously. Units, physics, maps, interfaces. While Fear can't completely edit some objects (such as mesh objects, which are edited by Loathing, or new unit/scenery graphics which require 3rd party tools), it covers most of the bases, and can be used to create some pretty nifty stuff.

And now, without further ado, it is time to learn something useful (wipe that scowl off your face).

Table of Contents
It's a big document out there...

Section II: The Actual Use of Fear

Section III: Tag Specific Documentation

Section IV: Some Other Miscellany Stuff

Fin.

Section II: The Actual Use of Fear

Installing Fear
In order to do its work, Fear needs to be placed in the same folder as the Myth II application. More specifically, it must be in the same folder as the tags folder, from which it reads and loads the tags for you to edit.

On both the PC and Mac platforms, you will need to do a "Custom Install" to get Fear onto your hard drive. See the "Read Me" text on the Myth II CD for more information. The Fear and Loathing versions located in the Myth II CD are outdated. Use the latest updater to get the latest versions of Fear and Loathing.

Opening and Editing Tags Image: Main Tags Group List
Opening tags is really very easy. If Fear is in the right place (that is, the same folder as the tags and local folders), you simply need to launch the Fear application to get started. Upon launch, Fear will automatically scan your tags and local folder, and create a list of all available tags.

To start with, Fear will display a list of installed tag groups. These are collections of similar tags, such as artifacts, sounds, or scenery. Beside the group name is a number that tells you how many tags are contained in these groups. Some, like observer constants, will probably never have more than one, but others can contain hundreds of tags. Double clicking on any of these groups will open a new window containing a list of that group's tags.

In some cases, you will notice that the tag names are in bold or plain text. If a tag's name is in bold text, it means that that tag is contained in a grouped tag file; at first, most of the tags will have bold names. Plain text names, on the other hand, mean that the tag is contained in a single tag file inside the local folder. The distinction isn't really important until it comes to saving files.

Kudos to you if you've guessed the next step: find the tag you want to edit, and then double click on it. If Fear is able to edit that tag, it will open in the appropriate editor. If not, nothing will happen; if you are madly clicking on a tag and it isn't opening, odds are Fear can do nothing with it.

Since each tag editor is different, they will be covered in greater detail later, though the suspense is no doubt killing you by now...

Saving Tags
Here is one area where Fear is different than the majority of applications. If you venture into the File menu, you will notice that Fear has no Save options. The reason for this is simple--Fear saves changes automatically.

If you open a tag, make any changes (sometimes even this isn't necessary), and then click the omnipresent OK button, Fear will create a new single tag file in the appropriate group folder inside the local folder. If there is already an identical tag in there, Fear will overwrite it. Here is where the bold and plain names become very important. If you are editing a bold named, grouped tag, Fear will create a new single tag--your changes won't affect the original. However, if you are editing a plain named, standalone tag, the changes will overwrite the original tag file in the local folder. The moment you click the OK button, your changes are saved--if you've messed up, hit the Cancel button and try again.

When you're making serious changes to an object, you should follow the time honored practice of backing up your original local folder. Fear has no Revert command, but you can always toss the local folder and start with a fresh copy or a backup.

Now then, you know how to open and save tags. Time to make ugly, and start actually editing those things.

The Menus
Fear doesn't have many menu commands, but those that it does have are very handy.

File Menu

  • New Tag - This command creates a new tag file in the group whose window is currently open. For example, if you have the meshes group window open, this tag will create a new mesh tag.
  • Open - This command is disabled-- you can safely ignore it.
  • Close - This closes the currently open window. No surprises here.
  • Get Info - This brings up information on the currently selected tag. More on this in a later section.
  • Build
    • Build Monolithic Tag Files - This command takes all of the tags present in your tags and local folders, and rolls them into complete, grouped tag files. Since this is not reversible, you should make sure that everything is working nicely first. In most cases, you shouldn't use this anyway--building plugin files is much more convenient.
    • Build Plug-in File - This command takes all of the tags in your local folder, and rolls them into a plugin file which you can name. This file is automatically placed in your plugins folder. Once you've finished creating and modifying tags, this is awfully handy for distributing them.
  • Import
    • Overhead Map - This command is used to import a pict file for use as an overhead map in a netmap. It imports it, names it, and creates a new collection tag for it. The Windows version of Fear does the same, except that it imports Windows bitmap files.
    • Netgame Preview - This command is for importing a 377x190 pixel pict file bitmap on PCs) for use as a netmap pregame screen... otherwise, it works exactly like importing an overhead map.
    • Plugin Icon - This command is for importing a 415x120 pixel pict file (yup, bitmap on PCs) for use as a plugin preview screen (as seen in the plugins dialog when you select a plugin). The plugin icon is stored in a special, hidden collection type, and when you build a plugin, it will automatically use the last plugin icon you imported.
  • Load Tag From Data File... - This command is for loading dialog information from external dialog editors. You probably won't ever have to use this.
  • Dump Text For Group - This is used to make Fear dump all of the text present in the highlighted group. Handy for extracting text or string lists, but mostly useless for other tags.
  • Quit - This command, upon being used, causes the world to end in a blazing fireball. Please, use it responsibly.

Edit Menu

  • Duplicate - This command is used to duplicate a highlighted tag. This is really handy when you want to create a new tag, but don't want to start from scratch. Want to make that Screaming Iron Assault Dwarf? Duplicate the dwarf tags and work from there.
  • Remove - I don't think this works...

Getting Info Image: Get Info Dialog
The Get Info box, summoned by highlighting a tag (not a tag group...), and selecting Get Info from the File menu, is a handy little beast.

Get Info Dialog

  • Group - This is the group to which this tag belongs, such as meshes or projectiles. The four letters in the parentheses are the abbreviation for that group-mesh for meshes, proj for projectiles, and so on.
  • Subgroup - This is the tag's abbreviated name, which Myth II actually pays attention to (it ignores the name, and deals with this instead). You can pretty much ignore this.
  • Size - This is the size of the tag in bytes. Remember, approximately 1,048,576 bytes is one meg (whee, useless trivia!).
  • Version - This is the version of Fear that this tag was created and last edited with. You can ignore it.
  • Destination - This is a filing setting-the grouped tag file selected in this pop-up is where this tag will go when someone uses the Build Monolithic Tag Files command in the File menu. While its location does not affect editing or use in any way, it is sometimes helpful to organize some tags into the appropriate grouped tag files. For example, most collections and sounds are marked to go in the large install file, as they are rather large and unnecessary for small installs.

Last Notes...
Fear, being the creation of a bunch of programmers for use by another bunch of programmers, has a few little things that may catch some people off guard. Here's a few of them.

Notes

  • Random Ranges - If you see two number fields right beside each other, separated by the word "to", you are dealing with a random range. They're really quite easy--Myth II simply chooses a random number from between the two numbers you give. The first field should always be smaller than the second, but if you ever want a random range to contain a constant value, just make the minimum (first field) and maximum (second field) the same value, and there you go. Myth II will always select this value.
  • Fractions - These are actually just decimal numbers ranging from 0.00 and up, usually to 1.00 (thought it can certainly go higher). It is easiest just to think of these like percents--1.00 is 100%, 0.50 is 50%, and 0.00 is 0%. You will often see these where you have random chance events, such as the chance a bottle has of exploding when it hits the ground. Just remember that 1.00 is full, and 0.00 is nothing.
  • I, J, K Components - These are just a different name for the X, Y, and Z components that we all know and love, except they are used in the context of a direction or velocity rather than a coordinate. I is X, or east and west across a map. J is Y, or north and south on a map. K is Z, or up and down in a direction perpendicular to the mesh. You will see a lot of these in the local physics objects, and scattered here and there throughout Fear.

Section III: Tag Specific Documentation

ambient sounds (amso) Image: Ambient Sound Editor
Ambient sounds are the sounds you hear in the background while you're playing. These can be anything from soothing natural noises to the cries of a boxing announcer (as implemented in some hilarious third party maps). While you can't actually edit the sound itself, you can modify some of its behaviors.

ambient sounds Tag Anatomy

  • Background Sound - This is the sound that is constantly played in the background, the ambient component of this ambient sound.
  • Random Sound - This sound is randomly played according to characteristics defined below, the random component of the ambient sound.
  • Inner Radius - This is the inner radius of the sound, or the blue circle when viewed in Loathing.
  • Outer Radius - This is the outer radius of the sound, or the cyan circle when viewed in Loathing.
  • Period (seconds) - This is the range that defines the random sound's period. The period of the random sound is the delay between each time it plays. The number is randomly selected from between the two numbers entered--to make it a constant value, enter the same numbers on both sides. Large period values result in less frequent random sounds, while short ones make the sound more common.
  • Random Sound Radius - This is the radius in which the random sound is audible.
  • Infinite Radius *NEW* - This allows the ambient sound to be heard throughout the map instead of being limited to a small area around the source of the sound.
  • No Position *NEW* - This takes away any directional/positional effects applied to the ambient sound, so that it will sound the same from anywhere on the map.

artifacts (arti) Image: Artifact Editor
Artifacts are those nifty items you can find in the Myth world that modify the traits of the units that find them. They can be anything from a slight improvement (such as a charm to ward off paralysis) to an armageddon weapon that only your Screaming Iron Assault Dwarf can handle.

artifacts Tag Anatomy

  • Collection - This pop-up allows you to select the sprite collection that this artifact uses. This is used purely for the Inventory Sequence, nothing else.
  • Monster Restriction Tag - This pop-up allows you to select the type of unit that can pick up this artifact. You might, for example, limit a magic sword to berserks, or a magical staff to warlock.
  • Monster Override Tag - Select a monster tag that you want the unit to turn into when holding this artifact (must be used in concert with the Overrides Owner Monster flag). The monster must share the same collection as the monster it is overriding. Using this, you can have a soldier pick up a bazooka and have its graphics, speed and attacks change to that of a soldier holding a bazooka.
  • Special Ability - This allows you to select the string list which contains the special ability text used by this artifact.
  • Vanishes after a Time Period - In the status bar you'll see a counter decreasing by the second, and when it hits zero the artifact vanishes.
  • Initial Charges - This range contains the number of uses (ammo) this artifact initially contains.
  • Projectile Pickup Adds Charges *NEW* - If this is checked, picking up an artifact of the same type will combine them into one and add their charges together as if they were ammo.
  • Charges Drop As Ammo Projectiles *NEW* - If this is checked, when the unit holding this artifact dies, the artifact is dropped as individual projectiles. Meaning, instead of dropping one artifact with multiple charges, you drop multiple artifacts with one charge each.
  • Maximum Charges *NEW* - If "Projectile Pickup Adds Charges" is checked, this value will be the maximum number of charges the artifact can hold.
  • Flags
    • Vanishes After Last Charge - If this is checked, the artifact disappears after its final charge is used. Otherwise, it still hangs around.
    • Remembers Charge Count - If the projectile is dropped and then picked up again, it will have the correct number of charges remaining. Previously this would have reset the projectile to a full charge count.
    • Display Charges As Percentage - Usually the number of charges left are shown as a number, however seeing you can now have some 32767 charges (the old limit was 127) you may occasionally wish to use the percentage method instead.
    • Cannot be Holstered - If you look at the Monster section lower down you'll note that monsters can now be defined to hold up to 9 projectiles at once. Only one is actively "held" and thereby overriding attacks and so forth, while the others are considered to be hidden in the monster's coat … or "holstered". This flag means that you cannot switch to another projectile after picking up this one. It stays as the held artifact until it is dropped or the unit dies. This is useful for when your Xena unit jumps onto a horse, and you don't want her to switch to using her Frisbee-of-death artifact unless she gets off the horse first.
    • Cannot be Discarded - Once you pick this baby up, you cannot drop the artifact using the Inventory method (Shift-I).
    • Only Restricted Monster Overrides - A "feature" in Myth has always been that not only the Monster Restriction Tag monsters can pick up a projectile. If, say, it is of Small volume then a unit that picks up Small volume objects (like a ghol) could also get it. And furthermore the ghol could use the override attack as well. If you don't want this behaviour, check this box.
    • Restricted By Monster Collection - Lets say you have a range of monsters, sharing the same collection of the Monster Restriction Tag, that you'd like to be able to use this artifact. Check this flag and that's what'll happen.
    • Overrides Owner Attack - If this is checked, this item overrides the attack of the unit that picks it up.
    • Overrides Owner Monster - This enables the Monster Override Tag described above.
    • Use Original Death Projectile Groups - If overriding the monster tag, however you don't want the override monster tag's projectile groups to be used on death, then tick this flag.
    • Monster Attacks Don't Use Charges - Forces the attacks from the monster tag overriding the original not to use any artifact charges. However, the attack from the artifact tag itself will still use charges.
    • Not Dropped On Death - Pretty much what it says.
    • Alters Monster Yaw - When you pick this up, the monster will turn to face the direction the projectile was facing. Useful for cowboys getting on horses, soldiers into tanks etc.
    • Slows Monster Speed - Used only with artifacts that override the Monster Tag, this will slow the monster to the speed in the override Monster tag regardless of whether the artifact is currently held or in the inventory. Useful if you've picked up a 10 ton anvil for throwing at an enemy, but have it in the inventory. The exception is when the current held artifact has Cannot be Holstered checked, in which case its speed value is used.
    • Override Attack Hides Other Monster Attacks - Makes the artifact hide the unit's other attacks if they are the same type as the artifact's attack. If the artifact's attack is a special attack, this flag will hide any other special attacks the unit has by default.
    • Doesn't Override Monster Effect Modifiers *1.7.0* - Makes an artifact have no effect on a unit's effect modifiers. This flag has no effect on artifacts that override the unit's monster tag.
    • Overrides Monster Collection *NEW* - This is similar to "Overrides Owner Monster", except it allows you to switch to a unit with a different collection than the original monster. Note that "Monster Override Tag" will allow you to select a unit tag instead of a monster tag when this is checked.
  • Artifact Sequences (window)
    • Inventory - This pop-up allows you to select the sequence that will be used for the artifact's inventory icon.
  • Artifact Projectiles (window)
    • Projectile - This pop-up allows you to select the projectile that represents this artifact, not the projectile its attack might generate. Actually, this is unused by Myth.
  • Effect Modifiers (window) - This set of modifiers override the unit's object damage modifiers. Each is a fraction that is applied to the damage of the appropriate type that is suffered by the holder of the artifact. 1.00 means that there is no change--the unit suffers damage as normal. A value of 2.00, on the other hand, would result in double damage, and a damage type of 0.50 would result in half damage. And 0.00...well, can you say Amulet of Utterly Senseless Invincibility?
  • Override Attack (window) - This window is identical to the attack edit window in the monster tag section. Please refer to it for more information on editing the artifact's override attack.

collection references (core) Image: Collection Reference Editor
Collection references are sort of like collection modifiers--they take a collection, and play with its tints and colors to create various permutations of a sprite set, allowing one to considerably alter a collection without creating an entirely new sprite set.

collection references Tag Anatomy

  • Collection - This allows you to select the collection referred to (and altered by) this collection reference.
  • Sprite Preview (un-named) - This area and buttons (Previous and Next) allow you to take a look at the sprites you are altering. Note that the sprite is automatically scaled to fill the area.
  • Permutation List (un-named) - This list allows you to add or delete new permutations, whose colors can be altered in the color list.
  • Color List (un-named) - This list shows all of the color available to alter within this collection. Double clicking on a color brings up the Color Edit window. It should be noted that the "primary" and "secondary" colors take on a special meaning in netgames--these colors are overridden by a player's chosen primary and secondary colors.
  • Tint
    • Tint Fraction - This color is used to tint the sprites, which allows you to do such things as tint a sprite with black to darken it for a nighttime map. Darkened units, darkened trees, and darkened projectiles all look better on a dark map than bright, happy daytime units.
    • Edit Tint Color - This button brings up the Color Edit window, which is used to select the tint color.
  • Color Edit (window)
    • Color (un-named) - This is the color (Wow! Really?). Clicking on the color brings up a color picker, so you can change it relatively easily.
    • Color Flags
      • Is Reversed - We can't remember exactly what this does...
      • Uses Global Tint - If this is flagged, the Global Tint of the mesh (see mesh object) is used in lieu of this color.
      • Is Unused - True to its name, this flag is unused. Ignore it.
  • Overrides Player Tints *1.7.2* - If checked, makes the units using this collection reference keep their colors instead of using the player colors they would otherwise use when played in a multiplayer game.

collections (.256)
Collections are collections of graphics and sprites. Myth editing veterans will recognize these as .256 objects, where all of Myth's graphical elements are stored.

However, Fear cannot edit these tags-- they require an external, third party editor due to the sheer complexity of editing, importing, and exporting sprites. At present, the only such editors are Amber 2.0b6 (a MacOS Classic application), Tahoe (a Windows application that is more limited than Amber), and Oak (a cross-platform application that can do more than Amber and Tahoe).

connectors (conn) Image: Connector Editor
Connectors are the things that are strung between scenery objects to create fences and other such objects.

connectors Tag Anatomy

  • Collection Reference - This pop-up allows you to select the collection reference used by this connector.
  • Normal - This pop-up allows you to select the normal, undamaged sequence for this connector.
  • Damaged - This pop-up is for selecting the sequence to be used when the connector is damaged.
  • Origin Height Fraction - This number is the height (on the pole object sprite) that the connector is drawn. This is used to adjust the height of the sprite, so that it isn't on the ground and actually appears to be properly strung between the fence posts.
  • Interpolant Distance - This is the distance (in world units) at which the connector sprite is repeated. This is used to create smooth, unbroken connectors--if this value is too large, there will be gaps between repetitions of the sprites, which (in terms of realism) officially sucks.

detail maps (dmap) *1.7.0*
Detail Maps are optional Myth II tags that tell the game which detail textures go on what maps and in which specific sections. Fear cannot edit these tags. They were introduced in 1.7.0 and can only be modified by Oak.

detail textures (dtex) *1.7.0*
Detail Textures are optional Myth II tags that give maps extra detail that cannot normally be added to the color map. Fear cannot edit these tags. They were introduced in 1.7.0 and can only be modified by Oak.

dialog string lists (ditl)
These are actually just another type of string list (more on these later). These string lists contain (surprise surprise!) lists of strings that are used by Myth II's dialog boxes. The reason they are separated is a closely guarded secret, but rest assured that it has nothing to do with mind control lasers or orbital mirrors.

If you ever feel a burning need to edit the strings in Myth II's error messages, look no further than these tags.

dialogs (bina)
Dialogs are the screens and boxes used by the Myth interface to give and receive information. Every window and dialog box is defined by one of these tags.

However, Fear cannot edit these tags-- they require external tools to be modified, which generally isn't a very good idea anyway.

fonts (font) Image: Font Editor
Fonts are, surprisingly enough, fonts used by the Myth application. While there isn't much you can do to these tags inside of Fear, you can play around with a few things.

fonts Tag Anatomy

  • Styles
    • Italic - This is the font that is substituted for this font when a |i switch is typed (a pipe followed by an I, the familiar italic text switch).
    • Bold - This is the font that is substituted for this font when the |b switch is typed.
    • Condensed - This is the font that is substituted for this font when the |c switch is typed.
    • Underlined - This is the font that is substituted for this font when the |u switch is typed.
  • Edit Kerning By Hand - This button, when clicked, asks you to choose which character you want to edit (just type it in), and then to enter the kerning for that character. Kerning is the width of the character, or rather how much room is allotted for it on a line of text. If a character appears to have too much space beside it, just decrease the kerning a bit.
  • Edit Kerning From File - This allows you to import a font into Myth, which is automatically kerned by the application. However, this requires specially prepared fonts, so you probably shouldn't mess with this one. Who wants to mess with fonts anyway?

formations (form) Image: Formation Editor
Formation tags contain alterable variables that allow you to customize (to a limited extent) the nature of your formations in Myth II. Since much of the formation information is hard coded and unchangeable, you cannot really change the shape of most formations. However, you can tweak them to provide just the right spacing for that defensive line or the perfect enclosure for that encirclement maneuver. Best of all, you don't have to worry about causing netgame problems-- your changes will not affect other players in the games you play.

formations Tag Anatomy

  • Maximum Units Per Short Line Row - This number defines the maximum number of units that will stand side by side per row in a Short Line formation (number 1).
  • Short Line Unit Separation - This number defines the amount of space between each unit in a Short Line formation (number 1).
  • Maximum Units Per Long Line Row - This number defines the maximum number of units that will stand side by side per row in a Long Line formation (number 2).
  • Long Line Unit Separation - This number defines the amount of space between each unit in a Long Line formation (number 2).
  • Maximum Units Per Loose Line Row - This number defines the maximum number of units that will stand side by side per row in a Loose Line formation (number 3).
  • Loose Line Unit Separation - This number defines the amount of space between each unit in a Loose Line formation (number 3).
  • Maximum Units Per Staggered Line Row - This number defines the maximum number of units that will stand side by side per row in a Staggered Line formation (number 4).
  • Staggered Line Unit Separation - This number defines the amount of space between each unit in a Staggered Line formation (number 4).
  • Box Unit Separation - This number defines the amount of space between each unit in a Short Line formation (number 5).
  • Minimum Mob Unit Separation - This number defines the minimum distance between each unit in a Rabble formation (number 6).
  • Mob X Bias - This number is used to determine how wide the mob is compared to how deep it is. A rabble with a value of two would be twice as wide as it is deep, while one with 0.5 would be half as wide.
  • Minimum Encirclement Radius - This is the minimum radius that an Encirclement formation (number 7 or 8) can have.
  • Shallow Encirclement Arc Length - This is the arc length (in degrees) that units in a Shallow Encirclement formation (number 7) try to line up on. 90 is a quarter of a circle, 180 is half a circle, and 360 is a complete circle.
  • Deep Encirclement Arc Length - This is the arc length (in degrees) that units in a Deep Encirclement formation (number 8) try to line up on. 120 is about a third of a circle.
  • Vanguard Front Row Separation - This number defines the distance between the units in the front row of the Vanguard formation (number 9).
  • Vanguard Unit Separation - This number defines the cumulative distance between the units in the Vanguard formation (number 9) as the row extends backwards. A large number creates a shallower V, while a smaller number makes a sharper formation.
  • Vanguard Row Separation - This number defines the separation between rows in a Vanguard formation (number 9).
  • Circle Unit Separation - This number defines the separation between units in a Circle formation (number 0). Smaller numbers make for tighter circles.

geometries (geom)
Geometries contain the data for model objects-- the actual, nitty gritty point data used to create a 3D structure.

Due to the complexity of 3D modeling, Fear cannot edit these objects. Like collections, they require an external, third party editor.

interface (inte) Image: Interface Editor
The interface tag contains a simple tag that organizes the Myth II interface. It points to the resources used by the interface, and probably won't make for very interesting editing, only a lot of headaches. No user serviceable parts inside, et cetera.

interface Tag Anatomy

  • Collection - This pop-up allows you to select the collection used by the Myth II interface.
  • System - This pop-up allows you to select the general system font.
  • Low Resolution - This is for selecting the in game font used when Myth is being played in low resolution mode.
  • High Resolution - This is for selecting the in game font used when Myth is being played in high resolution mode.
  • Narration Header - That's right-- this is for selecting the header font used during the narrations.
  • Narration Body - This is for selecting the main body font used during the narrations.
  • Narration Caption - This is for selecting the caption font used during the narrations.

lightning (ligh) Image: Lightning Editor
Lightning is the attack effect that we all know and love. The lightning tags allow you to edit most of this weapon's characteristics, resulting in some bizarre variants of the original.

lightning Tag Anatomy

  • Collection Reference - This allows you to select the collection reference to use for this lightning object.
  • Sequences
    • Fork - This is the sequence used by forks coming off of this lightning bolt.
    • Main Bolt - This is the sequence used to create the main body of the lightning bolt.
    • Mesh Stain - This is the sequence used to create the mesh scar caused by this lightning bolt.
  • Shock Duration - This is not implemented... ignore it.
  • Fade Duration - This is not implemented... ignore it. Or ... not. When Bungie made myth 2 they halved the size of a world unit as part of making the mesh more detailed. Most values throughout the game, such as unit and projectile speeds, were doubled to take this into account. They forgot, however, to look at the lightning code. What happened as a result was that the individual segments that make up a bolt were now half the length they were before, resulting in a twisting knotty line with hairy forks coming off it - a very different effect from what had been seen in TFL. You can restore the appearance of TFL lightning by putting a value >= 0.500 in the fade duration field. If you put a positive value that is less than 0.5, the lightning will come partway towards TFL, but still retain the m2 curvature.
  • Bolt Length - This is the average length of the lightning bolt.
  • Velocity - This is the velocity of the lightning bolt--generally, lightning bolts are pretty speedy.
  • Scale - This fraction is the scale applied to the lightning bolt sequences. 1.00 is normal size, while 2.00 is double size and 0.50 is half size, etc.
  • Fork Segments - This random range determines the length of the segments that break off of the main bolt. These secondary bolts don't actually cause damage, but they sure look cool.
  • Fork Overlap - This is the number of pixels that the fork segment sprites overlap. Too little causes gaps in the bolt, as does too much. Fine tuning this number results in a nice, continuous bolt of lightning.
  • Main Bolt Overlap - Just like the fork overlap, except for the main bolt of the lightning.
  • Fork Angle - This is the angle at which forks split off of the main bolt. An angle of 90 would cause the forks to travel off perpendicularly from the main bolt, while greater values would actually cause the forks to travel backwards with respect to the motion of the bolt.
  • Apparent # of Bolts - This is (appropriately) the apparent number of bolts inside a bolt of lightning. Some lightning attacks use more than one bolt in order to simulate a complex, twisting bolt.
  • Flags
    • Duration Based on Length - If this is flagged, the duration of the bolt is based upon its length.
    • Scars Ground - If this is flagged, the bolt scars the ground when it explodes.
    • Moves Objects - If this is flagged, the lightning bolt moves things that are beneath its flight path, by means of tiny, mostly non-damaging explosions. This does have the effect, however, of detonating explosives.
    • Ignores Collisions With Models - If this is flagged, the bolt can shoot through models as though they were not there. Not too realistic, but oodles of fun.
    • Has TFL Collision Radius - If this is flagged, the bolt's collision radius will the same as it would be in TFL (or same as it is with vTFL enabled).
  • Damage Parameters (window) - This window is identical to the one used to set projectile damage parameters, so you should refer to the projectiles section for more information on how to use it.

local physics (phys) Image: Local Physics Editor
Local physics are the physics models used by Myth II to define such behavior as gravity and the motion of particles in a local projectile group. They are rather complex, having several different basic types with a whole host of variations thereof. In all cases, a physics model works on every particle in the local projectile group calling it. Be prepared to examine and compare some of the existing models before you have a solid understanding of them yourself.

local physics Tag Anatomy

  • Type - This pop-up allow you to select the type of physics model being used, and the Edit Physics Parameters button will bring up a different window depending on what you have selected.
  • Linear Physics (window)
    • Linear Acceleration
      • I component - This is analogous to the X (east/west) component of a particle's acceleration.
      • J component - This is analogous to the Y (north/south) component of a particle's acceleration.
      • K component - This is analogous to the Z (up/down) component of a particle's acceleration.
    • Random Acceleration
      • I component - This is analogous to the X component of a particle's random acceleration, which is randomly added to the linear acceleration.
      • J component - This is analogous to the Y component of a particle's random acceleration, which is randomly added to the linear acceleration.
      • K component - This is analogous to the Z component of a particle's random acceleration, which is randomly added to the linear acceleration.
    • Initial Linear Velocity
    • I component - This is the range between which the particle's initial X velocity is selected.
    • J component - This is the range between which the particle's initial Y velocity is selected.
    • K component - This is the range between which the particle's initial Z velocity is selected.
    • Flags
    • Projectiles originate within bounds - This flag is kinda tricky--when it is checked, particles are always created within the bounds of the group that called the physics model. This is demonstrated by such things as Soulblighter's crows, which all originate from within his body--the bounds of his local projectile group. Other examples of this are teleportation effects.
    • Projectiles respect group yaw - When this is checked, the axes of the physics model are twisted so that the positive X (or I) axis is facing in the same direction as the group that called it. Again, Soulblighter demonstrates this with his diverging crows, which always shoot out in front of him.
  • Cylindrical Physics (window)
    • Angular Acceleration - This is the acceleration of particles around the center of the cylinder.
    • Initial Angular Velocity - This range determines the initial velocity of particles traveling around the cylinder.
    • Initial Z Deviation - This value determines how spread out the particles are along the Z axis--this value is measured from the vertical halfway point of the object calling it, and the deviation extends above and below this mid range.
    • Attraction Constant - This is the amount of attraction the midway Z plane (see above) has for the particles above and below it. This attraction pulls the particles towards the plane, causing them to pass through the plane, oscillate above and below it, and cause a nifty wave motion.
    • Radial Velocity - This is the speed at which the particles move along their radius, away from the middle. Positive values cause the particles to move slowly away, gradually dispersing, while negative values cause them to move ever inwards.
    • Z Acceleration - This is the particle's acceleration along the Z axis, upward or downward.
  • Spherical Spring Physics (window)
    • Initial Angular Velocity - This random range determines the initial speed of the particles around the center of the sphere along the Z axis.
    • Attraction Constant - This is the amount of attraction the center of the sphere has for every particle in the system. The greater the attraction, the harder a particle is pulled towards the middle, and the faster it travels outward after passing through the middle.
    • Random time offsets - If checked, this causes the particles in this system to be randomly spaced out within the area, creating a more random pattern of particles. If this is not checked, many of the particles move in unison.
  • Point Attractor Physics - Due to a problem with energy loss (or rather, integer round-off), this model type doesn't work very well, and is more or less the same as a well designed spherical spring. Just Say No to point attractors.
  • Converging Physics (window)
    • Initial Angular Velocity - This random range determines the initial angular velocity (around the Z axis) of particles in this group.
    • Phi Min - This number is the minimum angle of elevation at which inbound particles will approach. For example, if it was 45, all particles would approach at an angle above 45 degrees.
    • Phi Delta - This number is upper value of a random range from which the angles of particles is selected (whew). Since 0 is the lower bound, a setting of 45 here would result in particles appearing anywhere between 0 and 45 degrees. To make particles come from every angle, just put 90 in here, since the angles are measured from the ground (0 degrees) to vertical (90 degrees) in every direction.
    • Diverge - If this is checked, the motion of the particles is reversed--they spread outwards instead of inwards.
  • Explosive Gas Physics (window) This physics type was imported verbatim from the Myth III code. We're not sure what it does, other than allowing an explosive type of effect.
    • Starting Velocity - The speed the projectiles have before they accelerate.
    • Radial Acceleration - This is the speed at which the particles move along their radius, away from the middle. Positive values cause the particles to move slowly away, gradually dispersing, while negative values cause them to move ever inwards.
    • Linear Acceleration - The I, J and K components allow you to define the speed at which the projectiles explode upwards and outwards.
    • Drag - Velocity is scaled by this value every tick.

local projectile groups (lpgr) Image: Local Projectile Group Editor
Local projectile groups are the tags that create such effects as smoke and fish jumping out of the water. Basically, they are groups of particles that are acted upon by local physics objects, resulting in predefined motion around a (usually) stationary spot on the map.

local projectile groups Tag Anatomy

  • Collection - This pop-up is for selecting the sprite collection reference tag used by this group.
  • Physics - This pop-up is for selecting the local physics tag that affects every particle in the projectile group.
  • Sequences
    • Flight - This is for selecting the in-flight sequence for the particles in this group.
    • Stain - This is for selecting the stain sequence used by this group.
  • Scale Fraction - This random fraction range is used to scale the sprites used for the group, which can be used to create particles of varying sizes in the group. This is awfully handy for things like smoke, which should have different sizes of puffs.
  • Animation Rate - This random fraction range is used to vary the speed of the sequence animations, resulting in such things as puffs of smoke that grow slower or faster than the others in their group.
  • Target Number - This random range is used to set the number of projectiles in the group.
  • Radius - This random range is used to determine the radius of the group, which works in team with physics models to create effects over areas of varying sizes.
  • Projectile Expiration Time - This random range determines the lifespan of particles in the group, which are in seconds. Long expiration times are handy for slow rising columns of smoke, while short ones are recommended for groups that contain large numbers of particles.
  • Height Offset - This value is added to the initial elevation of the local projectile group (remember, this can be raised above the ground) to offset it. If you want a group to originate higher than its starting point, insert a positive value. If you want it lower, use a negative value.
  • Startup Transition
    • Has Startup Transition - If this flag is checked, then the group has a startup transition as defined below.
    • Affects transparency - If this is checked, the transition fades the particles in.
    • Affects target number - If this is checked, the transition gradually adds particles.
    • Affects horizontal scale - If this is checked, the transition affects the horizontal scale of the particles... this can be handy for some special effects. The particles will go from the scale specified in the first field (0.00 being invisibly small, 1.00 being normal size, and 2.00 being double size, etc.) to the scale specified in the second field over the duration of the transition.
    • Affects vertical scale - If this is checked, the transition affects the vertical scale of the particles... this can also be handy for some special effects. As with horizontal scale, particles transit from the first scale to the second.
    • Time - This is the duration of the transition.
  • Duration
    • Has Finite Duration - If this is checked, the group has a limited lifespan.
    • Time - This random range is the lifespan of the projectile group
  • Ending Transition - This section is similar to the Startup Transition, except in the opposite direction--this transition is for when the group is ending.
  • Projectile Flags
    • Affected by wind - If this is checked, the particles in this projectile group are affected by the wind present in a mesh.
    • Deleted when they hit the ground - If this is checked, the particles are deleted when they hit the ground. This is great for thinks like fountains and leaves, which would otherwise build up and begin to slow things down.
    • Deleted after time expires - If this is checked, the particles are deleted after their duration expires.
    • Deleted after animation completes - If this is checked, the particles are removed after their animation cycles complete.
    • Do not animate - If this is checked, the projectiles are not animated, using instead a single frame for each particle.
    • Never get recreated - If this is checked, the group is a one shot deal--projectiles are never recreated, and the group essentially expires once the particles are used up.
    • Stay relative to center - If this is checked, the particles move along with the projectile group. An example of this is the confusion effect, which has little stars which always orbit the affected unit's head.
    • Created symmetrically - If this is checked, the particles will be created so that they are equal distances from each other, nice and symmetrical like. The confusion spell uses this flag to evenly space the stars around a hapless victim's head.
    • Don't respect height above ground - If this is flagged, the projectile group is always on the ground, no matter how high in the air it originated. Handy for fire, especially when using fire arrows to shoot hapless birds...
    • Always start at first frame - If this is checked, the particle animation always starts on the first frame, not the usual randomized frame. Useful for ensuring a proper sequence of frames
  • Group Flags
    • Always update physics - If this is checked, the local projectile groups physics are constantly updated, even if the group is invisible (due to a map action or other effect). Accelerations are applied, particles move, and so on even when you can't see them doing so.
    • Delete after particles are gone - If this is checked, the group is deleted when all of its particles are expired and used up.
    • Casts Reflections - If this is checked, the group casts a reflection in any nearby media. Good for most things.
    • Is media surface effect - If this is checked, the group is a media surface effect, like a ripple or a fish leaping, or maybe even a lava bubble.
    • Update per tick - If this is checked, the group's physics are updated once every tick, and only during every tick. This is important for some synchronized projectile groups. If the game is ever suffering from a poor frame rate or other slowdown, groups without this flag may begin to behave oddly, as their physics are not being updated consistently.
    • Uses Owner Color Table - If this is checked, the group uses certain colors that belong to their owners. This only affects local proj groups linked to monster tags.
  • Transfer Mode - Transfer modes are how your particles behave during startup and ending transitions. Consequently, if your projectile group has neither, the transfer mode is ignored.
    • Fade In Over Time - If this is selected, particles fade in over the duration of the startup transition.
    • Fade In Over Animation - If this is selected, particles fade in over the duration of their animation sequences.
    • Fade Out Over Time - If this is selected, particles fade out over the duration of the ending transition.
    • Fade Out Over Animation - If this is selected, particles fade out over the duration of their animation sequences.
  • Visibility Type *1.7.0* - You can make a local projectile group visible only to specific groups of players. By default, everyone will be able to see it.
    • Visible To Everyone - If this is selected, everyone can see this local proj group. (default)
    • Visible To Owner Only - If this is selected, only the owner player can see this LPGR.
    • Visible To Team Only - If this is selected, only the owner's team can see this LPGR.
    • Visible To Allies Only - If this is selected, only the owner's allies (and the owner) can see this LPGR.
    • Visible To Enemies Only - If this is selected, only the owner's enemies can see this LPGR.

media types (medi) Image: Media Type Editor
Media types contain some of the information Myth II uses to determine the characteristics of water, or any other media, in a map. Such things as reflectivity and waves can be set and edited here, and the possibilities range from lava to sewage to spring water.

media types Tag Anatomy

  • Collection Reference - This pop-up allows you to select the collection reference used by this media type.
  • Surface Effect - This allows you to select a local projectile group for a surface effect, such as a fish jumping or a lava bubble bursting.
  • Reflection Tint Fraction - This is the intensity with which this media tints things reflected in it.
  • Reflection Tint Color - This is the tint color applied to objects reflected in this media.
  • Reflection Transparency - This fraction defines how transparent a reflected object is, which can be used to create murkiness in the water. 1.00 is fully transparent (therefore, no reflection), while 0.00 is not transparent at all.
  • Surface Effect Density - This is the density of surface effects on the media surface. If you have something like fish jumping, this should be fairly low. However, if you have something like active lava bubbling, this should be much higher.
  • Max. Effects Per Cell - This is the maximum number of effects that can appear in a single cell.
  • Time Between Effects - This number of seconds is used to space out surface effects, and in addition to the Surface Effect Density does a pretty good job at it, even if it isn't a random range.
  • Projectile Groups
    • Small Splash - This is the projectile group called when a projectile marked as having a small splash hits the media.
    • Medium Splash - This is the projectile group called when a projectile marked as having a medium splash hits the media.
    • Large Splash - Guess.
    • Bloody Splash - This is the splash projectile group made when a projectile flagged as being bloody hits the media.
    • Floating Splash - This is the splash projectile group called when a floating object (such as a netgame ball) hits the media.
    • Steam Splash - This is the projectile group called when a projectile marked as being on fire hits the water.
    • Disturbance - This is the projectile group called when a unit walks through the media (its wake).
  • Flags
    • Media Does Not Reflect - If this is checked, the media will not reflect objects. Useful for special media like lava.
  • Wobble Magnitude
    • I component - This is the amount of wobble (undulation... well, waves) that this media type has along the east/west axis.
    • J component - This is the amount of that this media type has along the north/south axis.
    • K component - This is the amount of wobble the media has in the up/down direction.
  • Wobble Phase Multiplier
    • I component - This multiplier fraction is applied to the east/west wobble of this media type. 1.00 is normal wobble, while 0.00 is no wobble whatsoever. Any value above 1.00 is exaggerated wobble--try taking a look at the level 19 Tain media to see a good example of this.
    • J component - This multiplier fraction is applied to the north/south wobble of this media type. 1.00 is normal wobble, while 0.00 is no wobble whatsoever.
    • K component - This multiplier fraction is applied to the up/down wobble of this media type. 1.00 is normal wobble, while 0.00 is no wobble whatsoever.

mesh effects (meef) Image: Mesh Effect Editor
Mesh effects are the rippling, wavelike deformations of the ground caused by explosions or other similar events. Wight explosions, satchel charges, and some magic spells call mesh effects, making the ground wave beneath them. It helps to take a look at some of the existing mesh effects to get an idea of how the numbers affect them.

mesh effects Tag Anatomy

  • Amplitude - This is the vertical measure of the effect--how high and how low the waves travel relative to ground level.
  • Velocity - This is the speed at which the wave expands outwards from its source.
  • Cutoff Radius - This is the maximum distance away from the origin that the wave can travel.
  • Dissipation - This is the rate at which the wave diminishes as it travels outwards.
  • Epicenter Offset - This value causes the ripple to begin further away from the epicenter (where the mesh effect was actually called). For example, a wight with an offset would not cause the ground beneath him to ripple, only the ground further out.
  • Camera Shaking Type - This setting allows this mesh effect to shake the camera when it is called. Earthquake causes the camera to shake a bit, build up to some serious shaking, and then fade away over about eight seconds. Explosion, on the other hand, skips the pleasantries and goes right to shaking. Keep in mind that these cause the camera to shake no matter where it is in relation to the explosion, and should be used very sparingly. Expect a mob of people to lynch the first hapless individual who creates a netmap using anything that shakes the camera...
  • Is Inverted - If this is checked, the mesh effect first goes down, then comes up, instead of the other way around.
  • Shockwave
    • Has Shockwave - If this is checked, the mesh effect also generates a shockwave using the following information.
    • Collection Reference - This is the collection reference from which the mesh effect draws its shockwave sprites.
    • Sequence - This is the sequence used by the shockwave.
    • Number of Radial Points - This is the number of points around the edge of the shockwave. More points result in a smoother, but slower, shockwave. Just for giggles, try making four and fewer point shockwaves...
    • Thickness - This is how thick the shockwave is from its leading to trailing edge.
    • Height Offset - This is the distance between the shockwave and the ground.

mesh lighting (meli) Image: Mesh Lighting Editor
The mesh lighting tag contains the constants used by Myth II's lighting engine to create light and shadows on a map. There aren't many interesting things to edit here, but you might want to check it out if you're creating a map with radically different lighting (a night or high noon map comes to mind).

mesh lighting Tag Anatomy

  • Incidental Light - This is the primary, angled light for the entire level, like the sun. The angle at which it faces is determined by the IJK components, and it helps to think of the angle and direction of the light as a particle flow whose velocities are determined by the components below.
  • I component - This is the east-west component of the light/particle flow.
  • J component - This is the north-south component of the light/particle flow.
  • K component - This is the up-down component of the light/particle flow (this should always, always be negative, unless you are doing some whack things).
  • Ambient Light Intensity - This is the intensity of the ambient light on the level.
  • Maximum Diffuse Light Intensity - This is the maximum, unmodified intensity of light on the map
  • Model Shading Diffuse Light Intensity - This is the intensity of the light in the shadow of a model. A high value makes the shadows lighter, while a value of 0.00 would make the models have an absolutely dark shadow.
  • Maximum Total Light Intensity - This is the maximum total light intensity on this mesh.
  • Maximum Shadow Distance - This is the maximum distance at which shadows will be calculated for a model. Conceivably, if this was too small, the shadows of your models (as calculated in Loathing) would be cut off. However, this is unlikely with most models, and a higher value here results in slower shadow map calculation.
  • Smoothing
  • Gaussian Width - This is the width of the Gaussian blur that is applied to model shadows when the shadow map is calculated. The larger this value, the more blurred your shadows will be.
  • Filter Width - This is the width of the filter as applied to the shadows. Basically, larger values contribute to blurrier shadows. Don't sweat the details, as they say...

meshes (mesh) Image: Mesh Editor
Meshes are among the most complex objects in Myth II. They're also among the most important--they contain much of the information used to create a map in the form of references to other tags.

Due to their complexity, meshes cannot be edited entirely in Fear-- you need an external editor like Loathing to do any major alterations involving terrain, units, or scenery. Fear does, however, allow you to edit a number of very important map characteristics.

mesh Tag Anatomy

  • Landscape - This pop-up is for selecting the level's texture map collection.
  • Media - This pop-up is for selecting the level's media characteristics.
  • Mesh Lighting - This pop-up is for selecting the level's mesh lighting tag, which determines such lighting characteristics as shadows.
  • Particle System - This pop-up is for selecting the weather that is acting upon the level, such as snow or rain.
  • Map Description - This pop-up is for selecting the string list that contains the map's name and in game messages.
  • Wind - This pop-up is for selecting the level's wind tag, which determines wind characteristics.
  • Connector - This pop-up is for selecting the level's connector tag, which is used for things like fences/corrals. The connector is what you see linked to posts to other post (like in the tutorial map).
  • Hints List - This pop-up is for selecting the level's string list that contains the map's list of hints.
  • Team Names Override - This pop-up is for selecting the level's string list that contains the list of team names that will override the defaults. For single player only.
  • Collections
    • Pregame - This pop-up is for selecting the level's pregame picture (collection).
    • Overhead Map - This pop-up is for selecting the level's overhead map.
    • Postgame - This pop-up is for selecting the level's postgame picture (collection).
  • Next Mesh
    • Success - This pop-up is for selecting the mesh players proceed to if victorious.
    • Failure - This pop-up is for selecting the mesh players proceed to if they fail to meet mission objectives.
  • Game Sounds
    • Ambient Sound - This pop-up is for selecting the ambient sound that can be heard at any location on the mesh. Unlike placed ambient sounds, this sound is omnipresent and always at a constant volume-- it can be used for such interesting effects as background music (if done right).
    • Narration Sound - This pop-up is for selecting the sound that can be heard during the pregame (for single player).
    • Postgame Success *1.7.0* - This pop-up is for selecting the ambient sound that can be heard during the postgame when you win (for single player).
    • Postgame Failure *1.7.0* - This pop-up is for selecting the ambient sound that can be heard during the postgame when you lose (for single player).
  • Flags
    • Single Player Map - Is this map a solo campaign map, or a netgame map?
    • Supports Unit Trading - Does this map allow unit trading in netgames?
    • Supports Veterans - Can this map accept veteran units from prior levels or games?
    • Has Limited Terrain Visibility - If checked, the player cannot move the camera to where his units have not yet explored.
    • Is Complete - If checked, the overhead map is completely visible at the start of the game, as in netgames.
    • Can Catch Fire - If unchecked, no part of your mesh can burn. Period. Of course, nobody wants this checked...
    • Leaves Overhead Map Closed - At the start of the game, the overhead map will be closed, though it can be re-opened by the player.
    • Is Training Map - Myth II will open the first map it finds with this flag when the player clicks the "Tutorial" button on the main screen. Generally, you won't need to screw with this.
    • Has Ceiling - Does your map have a ceiling? Indoor maps usually have this checked, which prevents debris from flying over walls.
    • Has Terrain Following Camera - This flag makes the camera automatically raise and lower as you fly over rising and falling terrain. Rather annoying, but possibly useful.
    • Can Be Used by Demo - I'm not sure this is implemented.
    • Overhead Map Doesn't Scroll - If checked, the overhead map is shown completely instead of being confined within the boundaries it would normally use.
    • Models Don't Limit Rendering - Some models like the Gonen's Bridge model sit on top of "invisible" raised terrain to allow units to walk over them. If this flag is not set, Myth might not draw things on the other side of the hidden raised terrain, because it believes that terrain is blocking those things from view. Additionally, if this flag is set, then media cells containing models, but not replaced by those models, will be rendered at their normal height instead of their media height. This flag carries a performance penalty (albeit a tiny one), so don't set it if not needed.
    • Uses Anticlump - If checked, forces the map to use Anti-Clump gameplay.
    • Uses vTFL - If checked, forces the map to use vTFL (virtual TFL) gameplay.
    • Is Last Level of Scenario - If checked, will load the epilogue after beating this level for single player. Just like it does when you beat The Forge.
  • Cutscene Movies
    • Pregame - The tag of the cutscene movie to play before the level.
    • Success - The tag of the cutscene movie to play after a victory.
    • Failure - The tag of the cutscene movie to play after failing to complete a level.
  • Storyline
    • Pregame - The collection (picture) to use as a pregame scene in a solo player level.
    • Picture Captions - The string list to use as a caption displayed beneath the pregame picture.
  • Game Scoring Types - Checking these boxes enables the corresponding game types on the map. Naturally, this is only for netgames, and you must ensure that the appropriate game objects (flags, balls, etc.) are placed on the map with a map editor ahead of time.
  • Lighting
    • Dark Color Fraction - This is the maximum intensity of the dark color that can be used by a shadow. 1.00 results in maximum color, while numbers in the 0.75 to 0.9 range are more common. See the entry below...
    • Edit Dark Color - This is for selecting the dark color, which is the color cast by shadows on this mesh. Combined with the Dark Color Fraction, this is the darkest color that can be created by shadows. Usually, black is used for this.
    • Light Color Fraction - Like Dark Color Fraction, but for the light color. Usually, this is much smaller than the Dark Color Fraction, in the 0.10 to 0.50 range.
    • Edit Light Color - This is for selecting the light color, which is the color created by light casting objects. Think of it as the opposite of the darkest color--an area under maximum illumination will be this color.
    • Transition Point - This is the zero point--the illumination level at which there is no lightening or darkening on the mesh. Playing with this, you can make an entire map brighter (by decreasing the value) or darker (by increasing it).
  • Reverb Properties - Note that sound reverberation affects are not supported on all computers...
    • Environment - This pop-up allows you to select the generic sound environment.
    • Volume - This is the volume of the reverberations.
    • Decay Time - This is the time it takes for a sound to die away. Typically, a place with bare, hard stone walls would have a higher decay time, while a place with no walls (and thus, no echoes) would have a time of 0.00.
    • Damping - This is how much of the sound is absorbed by the environment.
  • Global Tint - This color is used to tint all colors on this mesh that have the "Uses Global Tint" flag set in their colors in their collection references (whew). The result is that you can set a unit's tint to Use Global Tint, and then set this tint on the mesh so that all of those units have the tint that you specify here. Very handy for night maps.
  • Team Count - This is the maximum number of teams on your map. This number does NOT include Team -1, which is used for scenery objects and other non-player objects.
  • Ceiling Height - This is the height of the ceiling in world Units. This number is ignored if the Has Ceiling flag is not checked.
  • Edit Blood Color - This allows you to edit the basic blood color on your mesh. Remember, extremely bright reds look unrealistic-- darker reds look much better in actual gameplay.
  • Fog - Fog is a wonderful, fantastic, incredibly neat looking thing that you should probably never use. Well, use it sparingly--fog effects are only available on some computers using certain hardware accelerators, and while it looks very nifty for them, other people won't even see it, and this can be a major advantage in some cases (like netmaps with thick fog).
    • Density - This is the density of the fog. Dense fog is harder to see through, and light fog is more like a barely noticeable mist, which can be great for adding atmosphere to a map.
    • Fog Color - This is for selecting the color of the fog. Usually, a nice light gray will suffice, but an enterprising person might use a black fog to create the illusion of night.

model animations (anim) Image: Model Animation Editor
Model animations are the tags that allow such effects as a windmill's turning blades or a raising drawbridge. They work very closely with models (surprise surprise!), but are actually fairly simple once the models are available.

model animation Tag Anatomy

  • Frames (un-named) - This nameless list window allows you to add, duplicate, or delete models that will be used as frames in your animation sequence. Clicking Add or double-clicking on a model brings up a small dialog box that allows you to select the model from a pop-up menu, or a Permutation, which is basically a variation of that model's textures and appearance.
  • Ticks per frame - This number represents the number of ticks (thirtieths of a second- 30 ticks = 1 second) per frame in your animation.
  • Flags
    • Random Initial Frame - The animation starts on a random frame in your list.
    • Animation Cycles - When this box is checked, the animation loops, returning to the first frame after the last and never ending.
    • Animate Back and Forth - When this box is checked, the animation runs through the frames, reverses direction, and then runs backward to the first frame.
    • Animation Initially Running - When this box is checked, the animation will start off running. If unchecked, the animation will require an external prompting to start up, as supplied by a map action in the game.
  • Sound
    • Forward - This pop-up allows you to select the looping sound to be played while the animation is running in a forward direction.
    • Backward - This pop-up allows you to select the looping sound to be played while the animation is running in a backward direction. Usually, you will only need to supply this sound if you have Animate Back and Forth checked.

models (mode)
Model tags are the actual tags you embed into a mesh--they contain all of the information used by a model except the actual geometry, which is contained in a geometry object. They also contain such information as the placement of textures, permutations, and transparency.

Again, due to the complexity of these objects, model tags are handled by external, third party editors and not by Fear itself.

monsters (mons) Image: Monster Editor
Monster objects are a common source of confusion. While easily being the most fun objects to play around with, they are often misunderstood-- a monster tag actually contains the behavior data for all units, not just monsters. The stats and behavior for warriors, berserks, and dwarves are all defined here alongside mauls, Myrkridia, and Trow. Lots of fun to tinker with...

Just remember that, when you create a new monster tag, you MUST ALSO create a unit tag that points to it, or your unit will not be available in map editors like Loathing.
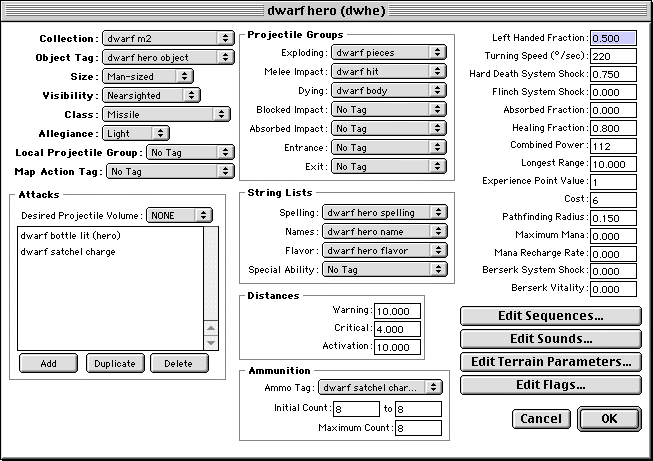
monster Tag Anatomy

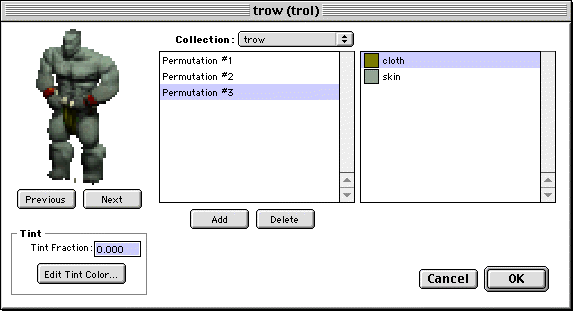
  • Collection - This is the collection of sprites used by this unit. Often, a unit is designed around these collections, not vice versa, so it might be a bad idea to switch these around (unless you been playing with the collections...).
  • Object Tag - This box is for selecting a unit's type. See the objects entry for more information on these tags.
  • Size - This flag is not for determining actual size, but for determining certain characteristics of a unit. A unit's size determines such things as whether or not a Trow, for example, will punch an enemy (if the enemy is giant size) or kick it (if it is smaller). It looks awfully silly when a Trow punches a dwarf, and even sillier when it kicks another Trow.
  • Visibility - This box allows you to select a unit's field of vision. A nearsighted unit does not see as far as a farsighted unit does, which means units will not fade in or appear on the overhead map until they are closer. If set to None, then the unit is essentially blind-- generally not a desirable thing, but it could be used for some unique units.
  • Class - This is the general class of units that this unit belongs to. The most common are Melee and Missile; hand to hand and long range units, respectively. Other unit classes include Suicide (such as Wights), Harmless (such as those hapless peasants), and Ambient Life (such as birds or chickens). Two others, Invisible Observers (hidden units that are used for map action scripts) and Special (not really used), are mostly used in map design.
  • Allegiance - This pop-up is for selecting a unit's allegiance-- Light, or Dark. In netgames, this doesn't matter, but in the solo game, it... well, it still doesn't matter much there either. Still, you should set this flag appropriately.
  • Local Projectile Group - This pop-up allows you to select an ambient local projectile group for your unit, one that follows the unit around. For example, if you select a chimney smoke group for your unit, he will appear to be perpetually smoking. This can be used for anything from mundane smoke to wild energy effects whirling around your unit.
  • Map Action Tag - This pop-up is for selecting a map action that will automatically be created for this unit when it is created in a level. Chickens and ambient life use this to create their wandering effects, and it is possible to create such things as ambient Wights with this tag.
  • Carries Multiple Items - You can type a minimum of 1 and a maximum of 9 if you check this flag. This will allow the unit to pick up multiple things at once. The player can switch between them using the new I key (Inventory) and shift-I to drop them.
  • Affects Morale - If checked, the unit can affect the morale of other units that have the "Morale can be boosted" flag checked. This flag needs to be checked for Affect Radius, Allied Kill Bonus, and Enemy Kill Bonus to have any effect.
  • Affect Radius - This is the radius in world units of the area affecting morale where the unit affecting morale is the center.
  • Allied Kill Bonus - This value is what will be added (or subtracted if negative) to the allied units' experience (kill/vet) count if they are within the affected area.
  • Enemy Kill Bonus - This value is what will be added (or subtracted if negative) to the enemy units' experience (kill/vet) count if they are within the affected area.
  • Attack Frequency - This provides an additional random delay range for attack recovery, and previously existed in the TFL monster tag. For the mapmaker who doesn't want their unit's sword swings to be as predictable as a swiss watch.
  • Attacks
    • Desired Projectile Volume - This pop-up is used to determine how large of a projectile a unit can pick up. Ghols, for example, prefer Small projectiles for their attack, and thus are set to small. This setting does not affect picking up ammunition.
    • Attacks (un-named) - This window list shows all of this unit's different attacks. You can add, duplicate, or delete entries from this list, and double click on them to edit them, which brings up a new Attack Edit window (see below).
  • Attack Edit (un-named window)
    • Projectile - This pop-up allows you to select the projectile created by this attack.
    • Sequences (un-named) - This list of four sequences defines the appearance of the attack. Double clicking an entry allows you to select one of this unit's available sequences (as defined in its collection). Selecting no sequence causes no sequence to be played--you should always have a sequence. In fact, Myth will not load if you don't have a sequence specified. In addition to selecting the sequence, opening the sequence edit window allows you to edit these three flags:
      • Normal - If this is checked, this sequence will be used as the unit's normal, default attack. An attack must have at least one Normal sequence. If it has more, it will randomly select a sequence from those available, which is how warriors can be made to swing their swords differently.
      • Declinated - If this is checked, this sequence is used when a unit is shooting at a downwards angle. Bowmen are great examples of this in action, as they have all three sequences and use them frequently. If no Elevated sequence is specified, the unit will simply use the Normal. And if no Normal is set, then the universe will implode and destroy all of reality. Be sure to set your Normal sequence.
      • Elevated - If this is checked, this sequence is used when a unit is shooting at an upwards angle. Again, bowmen are great examples of this in action. If no Elevated sequence is specified, the unit will simply use the Normal.
    • Minimum Range - This is the minimum range of this attack. If a target is inside this range, the unit will move away and try to correct this. Dwarves and archers use this.
    • Maximum Range - This is a unit's maximum attack range. Melee units usually use 2.000 for this, while Missile units often have a much greater range. Keep in mind that an attack's range is also limited by characteristics of the projectile being fired.
    • Repetitions - This is the number of times that an attack is carried out per command. If you set an archer's repetitions to 5, he will fire five arrows in rapid succession before pausing to... well, reload. If this number is negative and Uses Ammunition is also checked, the attack will restore ammunition by the number specified in Repetitions. Very useful for reload attacks.
    • Miss Fraction - This is the fraction of times that a unit will miss with his attack. For Melee units, this manifests as a harmless sword swipe, while for Missile units it results in an off shot. 1.00 causes the unit to miss all the time, while 0.000 results in no misses.
    • Initial Velocity - These two fields show the range between which a projectile's initial velocity will be. It will be a random value between the two specified, so make sure the first is less than the second. If you want the value to be constant, enter the same number in both fields. Melee attacks use 0.00 to 0.00, while a dwarf ranges from .150 to .170.
    • Initial Velocity Error - This is the amount of error that will be introduced to perfect initial velocity, causing the shot to miss. Melee units have an error of 0.00, while Missile units will often have a small error to keep them from hitting every time.
    • Velocity Experience Delta - This is the amount that is removed from the Initial Velocity Error every time a unit scores a kill, resulting in more and more accuracy as the unit becomes more experienced.
    • Recovery Time - This is the amount of time between a unit's attacks, in seconds. Keep in mind that a unit's attack time is also affected by the speed of its attack sequence animation. A unit cannot attack faster than that its animation can run. Also be aware that the Recovery Time is added again for every repetition in the attack. So if you have 10 repetitions and a recovery time of 0.1, the unit will actually pause a full second before firing again.
    • Recovery Time Experience Delta - This is the amount that is removed from the Recovery Time every time a unit scores a kill, resulting in faster and faster attacks as a unit grows more experienced.
    • Mana Cost - This is the cost of an attack in mana. A warlock's fireball has a value of 55.00, which is about half of his mana. This value can also be negative, causing the mana to be restored by the attack.
    • Attack Flags (inside Attack Edit window)
      • Is Indirect - This is whether or not an attack is directly targeted at a unit. An indirect attack is usually explosive, affecting any number of units around it, while a direct attack is a melee attack, that affects a single unit and no others. If indirect is checked then the unit will lob the projectile high in the air rather than throw it directly at the target.
      • Does Not Require Solution - If this is checked, the unit will attack as soon as an opponent is in range. He doesn't aim, doesn't check for elevation, or any of that jazz. He Just Does It. Great for guided attacks.
      • Aimed at Target's Feet - If checked, the projectile is aimed to hit the ground at the target's feet. This is useful for area effect attacks, like explosives, but lousy for impact weapons, like arrows or melee attacks.
      • Leads Target - If this is checked, the unit looks at how fast and what direction a unit is moving in and takes these into account before attacking. While this greatly improves accuracy, it can result in some shockingly stupid moves-- a dwarf will sometimes throw straight up into the air in order to lead a unit rushing towards it. The result is more often a dead dwarf than a dead opponent. Still, check this if you unit is using a missile attack.
      • Uses Ammunition - Just what it says. Attacks checked with this use ammunition from the unit's carried store, which is set elsewhere in the monster tag.
      • Uses Carried Projectile - This is what ghols do-- this attack uses a projectile determined by the unit's ammunition, which can be anything from a pus packet to an old sword to a head. Your damage and mileage may vary.
      • Is Reflexive - If this is checked, the unit inflicts this attack on itself. Silly in most circumstances, but very useful for targeting the ground directly beneath a unit (as a dwarf does when laying satchels) or inflicting a suicide triggering wound, as a wight does with its dagger.
      • Is Special Ability - If this is checked, the attack is activated using the Special Ability key (default T).
      • Cannot be Aborted - This acts like the "Does Not Interrupt Events" damage flag. When an arrow hits a Warlock as it is making a fireball, it makes him flinch. As a result the fireball is fired in an odd direction. If the warlock fireball attack had this flag checked, the arrow would not make the warlock flinch as it is making the fireball attack.
      • Is Primary Attack - If checked, this attack is the default attack selected and used when you simply tell a unit to attack a target. If this is not checked, you must trigger this attack using a double click, as in the case of an archer's knife attack.
      • Avoids Friendly Units - If this is checked, the unit takes into account the presence of friendly units when lining up for a shot (though, he never seems to do a good job). Should be checked for units using an explosive attack who might harm a friendly unit by attacking.
      • Vs. Giant Sized - This is an attack used only against units whose size is set to Giant. An example is a Trow's punch.
      • Prohibited vs. Giant Sized - This is an attack that cannot be used against Giant sized units. An example is a Trow's kick, which is used only against smaller units.
      • Is Fixed Pitch - If checked, the projectile will always be fired at an angle, resulting in an arcing shot instead of a direct, melee shot. Examples include dwarf cocktails and archer arrows.
      • Don't shoot over nearby units - If this is checked, the unit will not try to shoot over a nearby unit. This is very handy for dwarves, who we all know are stupid enough to try and throw a bottle through a comrade's head.
      • Lob to hit lower nearby units - If this is checked, a unit will try to lob a projectile at a target if that target is nearby and below the unit. This is specifically designed to help dwarves lob grenades from castle walls.
      • Can be used against friendly units - If this is checked, this attack can target friendly units. This is necessary for such things as healing, but not necessary for such things as fire arrows or dispersal dreams (though, we all love shooting those lippy dwarves with fire arrows...).
      • Player can Interrupt - If this is checked, the attack animation does not need to complete before the unit responds to user movement or other commands. This can be very useful for long-winded attacks (such as a napoleonic soldier reloading his musket) that you'd like the player to be able to abort easily.
      • Vs. Flying - This is an attack used only against flying units.
      • Prohibited vs. Flying - This is an attack that cannot be used against flying units.
      • No Monster Recovery Time - If this is checked, there will be no 'recovery time' (lag) for the unit before the next attack.
      • Vs. Undead - This is an attack used only against undead units.
      • Prohibited vs. Undead - This is an attack that cannot be used against undead units.
  • Projectile Groups
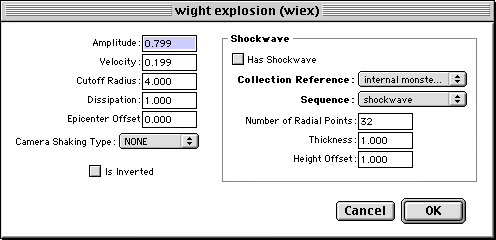
    • Exploding - This is the projectile group created when a unit suffers a "hard death"-- by an explosion or other sufficiently violent event.
    • Melee Impact - This is the projectile group created when a unit is struck with a melee attack, like a sword.
    • Dying - This is the group created when a unit suffers a "soft death"-- by melee attacks or fire, etc.
    • Blocked Impact - This is the group created when a unit blocks an attack, like a warrior does with his shield.
    • Absorbed Impact - This is the group created when a unit absorbs a blow, like a journeyman does with his coat.
    • Entrance - This is the group called when a unit enters the map. Usually, this is left empty.
    • Exit - This is the group called when a unit exits the map. Usually, this is left empty too, with exceptions such as Soulblighter, who can call his crow effects.
    • Burned - If your unit died of fire damage, you can use this to specify a projectile group that has them running in circles screaming like a stuck pig, with flames and smoke pouring off them before collapsing in a charred heap. I'm such a sadist.
    • Artifacts/Ammo - This is the group that will have the ammo or artifacts a unit will start with. This way you don't have to script a map to give a unit any starting ammo or artifacts. If any artifact in the group is marked as "Cannot be Holstered", then the rest of the artifacts in the list after that one (if any) will not be given to the unit.
  • String Lists
    • Spelling - This is for selecting a unit's spelling string list, which contains a unit's designation in singular and plural (i.e. Dwarf, Dwarves, or Ghol, Ghols). *1.7.0* - The 3rd string in this selection will replace the "None" text used in this unit's inventory index 0 (no artifact).
    • Names - This is for selecting the string list that contains all of the unit's possible names.
    • Flavor - This is for selecting the string list that contains all of the unit's possible flavor texts.
    • Special Ability - This is for selecting the string list that contains the unit's special ability text, which is displayed when you trigger a Special Ability attack.
  • Distances
    • Warning - This is the distance at which a unit becomes aware of other units' cries for help, such as when they've been attacked.
    • Critical - This is the distance at which the unit is warned (made aware of) another unit's presence. It is also the distance within which a unit will look for new targets if their previous target dies.
    • Activation - This is the distance at which a unit takes action of its own volition upon another unit. Highly aggressive or alert units have very large values here.
  • Ammunition
    • Ammo Tag - This allows you to select the type of projectile a unit is carrying as ammunition.
    • Initial Count - These fields allow you to enter an initial ammunition level, randomly selected from between the two numbers. If you want a fixed initial amount of ammo, enter the same amount in both fields.
    • Maximum Count - The maximum amount of ammo a unit can carry.
  • Left Handed Fraction - The fraction of units whose sprites are reversed (making them appear left handed).
  • Turning Speed - The speed at which a unit can turn, in degrees per second.
  • Hard Death System Shock - This number is used to define just how much damage a unit has to take to suffer a hard death from such things as an extremely hard hit.
  • Flinch System Shock - This number is used to define just how hard a unit has to be hit in order to flinch, or hesitate in its attack. For example, trow have a very high value here, which is why they can take such a licking and keep on ticking.
  • Propelled System Shock - This number is used to define just how hard a unit has to be hit in order to be propelled across the map by the damage. The Can Be Propelled flag must be checked for this to have any effect. Using this and the other Propulsion value, you could have a trow that literally kicks units around.
  • Damage to Propulsion - This affects both the speed and duration of the propulsion a monster receives from damage. The highest number (1.0) means maximum propulsion, while low numbers mean the unit will barely stumble. Note: Propelled monsters will stay level with the ground and will stop if they run into an obstacle or impassable terrain. Sadly therefore you cannot use this feature to smack units off the side of a cliff.
  • Absorbed Fraction - The fraction of blows that a unit will absorb without damage. Journeymen, for example, absorb quite a few hits due to their thick coats.
  • Healing Fraction - The fraction of a unit's health that can be restored through healing. 1.00 is complete restoration, while 0.00 is none at all.
  • Combined Power - This number is used by the Myth AI to assess a unit's attack potential and danger. Consequently, units with a high Power are treated more seriously by the engine in terms of targeting, attack, and defense.
  • Longest Range - This is the longest range at which a unit can attack.
  • Experience Point Value - This is the number of kills a unit is worth to others who might kill it.
  • Cost - This is the unit's cost during unit trading.
  • Pathfinding Radius - This number determines the unit's "space bubble"-- the minimum distance it will allow between it and an allied unit who is trying to pass by it. Naturally, enemy units ignore this...
  • Maximum Mana - This is the maximum number of mana points that a unit has.
  • Mana Recharge Rate - This is the rate at which a unit recharges mana points.
  • Berserk System Shock - If a unit suffers more damage than this amount, it will go berserk, attack all nearby units, friend and foe alike.
  • Berserk Vitality - This fraction is the amount of life at which a unit will go berserk. An example is the Myrkridia, which have a setting of 0.25, and go berserk when reduced to a quarter of their health. Very nasty.
  • Sequences
    • Primary - This is the unit's primary, just hanging around sequence.
    • Transition to Secondary - This is the transition sequence from primary to secondary.
    • Secondary - This is the unit's second chillin' sequence.
    • Transition to Primary - This is the transition sequence from secondary to primary.
    • Moving - This is the unit's moving sequence.
    • Running - This is the unit's running sequence.
    • Pausing for Obstacle - This is the sequence to play while the unit is pausing for an obstacle.
    • Turning - This is the (you guessed it!) sequence to play when a unit is turning.
    • Blocking - This is for when a unit is blocking an attack.
    • Flinching - This is for when a unit is flinching.
    • Being Propelled - This is for when a unit is being propelled by damage.
    • Holding for Attack - This is for when a unit is waiting to attack.
    • Ammunition Icon - Sequence is the single frame icon displayed beside a unit's ammunition count, like a dwarfs satchel count or an archers flaming arrows.
    • Picking Up Object - This is the sequence for when a unit is picking up an object.
    • Taunting - This is, quite shockingly, the unit's taunt sequence.
    • Celebration - This is the sequence played when a unit is celebrating a level or netgame victory. Often the same as their Taunt sequence.
    • Gliding - This is the sequence that flying units use when they are gliding.
    • Placeholder - This is, amazingly, a placeholder.
    • Head Shots - This is the unit's head shot, as displayed in the status bar at the top of the screen.
  • Sounds - The sounds dialog is very flexible, allowing you to fill slots with sound tags and specify what type of sound it is. The types you can assign are as follows.
    • Attack Order - This is called when a unit is ordered to attack.
    • Multiple Attack Order - This is called when the unit is repeatedly ordered to attack. Good for grumbling, petulant units like dwarves.
    • Attack Order vs. Undead - This sound is unimplemented... sorry.
    • Move Order - This is called when a unit is ordered to move.
    • Multiple Move Order - This is called when a unit is ordered to move multiple times. Also good for grumpy units.
    • Selection - This is called when you select (click on) a unit.
    • Multiple Selection - This is called when you repeatedly select a unit.
    • Hit Friendly Unit - This is called when the unit hits an ally. Usually an apology, or perhaps a warning.
    • Hit By Friendly Unit - This is called when the unit is hit by a friendly unit. Usually complaints.
    • Attack Obstructed By Friendly Unit - This is called when the unit's attack is obstructed by a friendly unit. Obviously, this is seldom called by melee units or units whose attacks are set to ignore friendly units.
    • Attack Enemy Unit - This sound is unimplemented... sorry.
    • Attack Enemy Unit with Friends Nearby - This sound is called when a unit is given an attack order and friendly units are nearby.
    • Sprayed with Gore - This sound is unimplemented... sorry.
    • Caused Enemy Death - This is called when the unit causes an enemy death (never would have guessed it...).
    • Caused Friendly Death - This is called when the unit causes a friendly death.
    • Caused Death of Enemy Undead - This is called when the unit kills an enemy undead unit.
    • Caused Multiple Enemy Deaths - This sound is unimplemented... sorry.
  • Terrain Parameters
    • Base Movement Speed - This is the speed at which a unit naturally moves. Note that changing this does not affect the unit's walking sequence animation, and major changes here will result in the walking animation not matching the unit's actual speed.
    • Speeds and Costs - All of these boxes determine whether or not a unit can cross a certain terrain. If the box is checked, a unit can cross this type of terrain. The Speed field beside it is the fraction of the unit's normal speed at which it will travel when it crosses this type of terrain (0.500 would be half speed, while 1.00 is full speed ahead and a speed of zero will make the terrain impassable for the unit). Terrain Cost values have been removed and do nothing now. New extended flags and fields have replaced the need of using Cost values which were being used to enable certain features.
  • Monster Flags
    • Translates Continuously - Monsters with this flag checked move smoothly despite not having a walk animation. Generally, you should use this only when the unit does not walk or animate as it is moving--soulless, shades, and other floating units are good examples of this.
    • Holds with Clear Shot - It was previously thought that this flag defined whether a unit stayed still after shooting or kept walking between shots, however we now know that it does nothing at all.
    • Floats - If checked, the unit will float just above the ground, as soulless and shades do.
    • Flies - If checked, the unit will fly and glide like birds do (you'll need to use this in conjunction with an object that is told to stay a set height above the mesh. You will then have to place the unit in Loathing and raise it into the air).
    • Raise to Flying Height - If checked, the unit is lifted 4 world units above the mesh at the start of a game.
    • Allows Projectiles to Pass Through - If checked, the unit is ghostly, and arrows or spears will shoot right through it continuing on to cause more damage. An example of this are soulless.
    • Experience Proportional to Damage - If this is checked, the unit appears to have more experience as its health decreases. This can be used to create a "berserker" effect, making a unit attack faster or more accurately when it is damaged.
    • Is Anti-Missile Unit - If checked, this unit will always try to target units with the flag below...
    • Is Anti-Missile Target - If checked, this unit will always be targeted by Anti-Missile units.
    • Turns to Stone When Killed - Units with this checked turn to stone when they die, a la Trow.
    • Concentrates on a Single Target - Units with this checked will focus their attacks on a single unit until it is dead, and then move on.
    • Is Undead - If checked, the unit is an undead unit.
    • Cannot Be Autotargeted - If checked, this unit cannot be automatically targeted by an attacking unit--it must be explicitly targeted by the player.
    • Is Giant Sized - If checked, this unit is considered to be giant sized, which can affect such things as attacks.
    • Does Not Respect Visibility - If this is checked, the monster is always visible--it does not fade out when it moves out of visual range. Great for things like winch and cannon monsters, which should always be visible (as they are actually a sort of scenery).
    • Is Not Solid - Units with this flag are like ghosts, able to pass through scenery marked as solid (unless it marks the mesh as impassable) and immune to non-area effect weapons.
    • Leaves Contrail - If checked, the unit leaves a ghostly trail behind it. It looks odd, but is useful in some cases. However, it tends to make a unit jerk along, and was never really used in Myth II apart from with Mahir.
    • Invisible on Overhead Map - This flag, quite appropriately, makes the unit invisible on the overhead map. Very useful for ambient life or really sneaky wights.
    • Cannot be Healed by Damage *1.7.0* - The "Cannot Be Healed" flag never worked before the 1.7.0 update. It was renamed for its new purpose. If checked, prevents the unit from being healed by damage based attacks.
    • Does Not Drop Ammo When Dying - When units with this flag die, they do not drop any ammunition they were carrying (like dwarves do with their satchels).
    • Is Inanimate Object - Units with this flag are inanimate objects. Examples of this include winch "monsters" and cannons.
    • Can Be Propelled - Units with this flag can be smacked around the map by damage.
    • If Ambient, can be targeted normally - Units with this flag that are marked as Ambient Life in Loathing will appear on the overhead as Yellow dots (not blue) and will have red selection boxes when you click on them. You can attack them by a simple click rather than having to shift-option-click.
    • Morale can be boosted - If checked, this unit's morale can be affected.
    • Always uses entrance projectile group - If checked, this unit's entrance projectile group will always be used when the unit is made visible. The entrance group is used even if the unit started visible on the map. If you prefer the unit appear until the end of the entrance, use scripting instead.
    • Can extend charge duration *1.7.0* - The "Unit can Charge" extended flag has a certain behavior that allowed the unit to extend its charge duration even when not attacking an enemy. For 1.7.0, this was altered so the default would not extend charge duration. When using 1.7.0 and you prefer that type of charging behavior, check this flag. However, in 1.7.1 the default behavior was reverted back to pre-1.7.0 making this flag obselete unless you are running 1.7.0.
    • Limited charge duration *1.7.1* - The 1.7.0 update changed the charge behavior (as mentioned in the flag above this one). Since the behavior was reverted, this flag will allow for the charge duration to not extend after moving away from an enemy like it did for 1.7.0.
    • Hide owner player's name *NEW* - If checked, will not show the owner player's name in the status bar when other players select the unit. It will however show the owner player's name during films.
    • Don't auto-equip initial artifacts *NEW* - If checked, will not auto-equip on an artifact that cannot be holstered which would otherwise prevent the unit from receiving other initial artifacts. This sets the unit back to inventory 0 after giving it the artifacts, and forces the unit to acquire all the initial artifacts.
    • Use Extended - This was formerly the unused "Is Skittish" flag. Now it is used to define whether any of the following flags are used for this monster. You can ignore the information on Terrain Cost values as they have been removed and replaced with real flags and field boxes since the 1.7.1 update.
      • Doesn't Close on Target - This applies to Melee units with both long and short-range attacks, such as bre'Unor. By default, such units will creep forward between attacks and eventually switch to the short range option and charge the enemy. This option lets you tell them to stand still if they have a valid attack to use.
      • Resizable Selection Box - All units in Myth 2 draw the size of the selection box (the yellow rectangle that appears when you select the unit) from their first idle sequence, and apply that to all the unit's sequences. With this value present, it will use whatever selection box size is present in the collection for the unit's Taunt and all Attack sequences. For instance, a weekend warrior in camies could duck down behind a rock when told to taunt and its selection box would shrink, making it much harder to hit with paintballs.
      • Unit can Charge - This only applies to units that have a Running sequence. It uses two other terrain fields - Snow Terrain Cost must hold a value being the distance in world units from enemies within which the unit will start running, and Rocky Terrain cost holding the percentage by which its speed is to increase (e.g. 50 to increase speed by 50%). The unit will run not only when ordered to attack, but also when damaged by an enemy within the Snow cost range. We considered stamina, but did not find a satisfactory method of implementing it in Myth. (1.7.1): Ignore the info on Terrain Cost values, instead use the following fields:
        • Speed modifier - Modifies the speed of the unit when charging to this value. ( 1.0 equals default walking speed)
        • Charge range (WU) - This is the range in world units away from a target in which the unit will start charging.
      • Turns in a Curve - By default, Myth II units will swivel on the spot when changing direction. With this flag they'll walk in a graceful curve instead, as units did in TFL.
      • Enemies Can't See Mana - Ever felt frustrated that your opponent knew exactly how much mana your warlock had? With this flag checked, only you and your allies will be able to see it.
      • Mana isn't Shown - Sometimes Mana is only there to control the mechanics of the unit and would be distracting to actually see in-game. Using this you can make it totally hidden from all players.
      • Mixes Missile/Melee Behaviour - For missile units such as a line of archers, when you click on a group of enemies only the clicked unit is highlighted, and the arcs all fire at this one unlucky unit. With this flag, all units in the enemy group will be lit up, and the archers will spread their fire. Shift-click will make them target the one unit if desired. For melee units, this value will give them some of the AI characteristics of missile. When standing around without any player orders (no stop or guard command), if struck by long range fire outside of the unit's activation distance it will decide to retreat like an archer or dwarf does. Standard melee behaviour is to stand firm regardless of damage. Also, if a melee unit with this flag auto-responds to an enemy within range and attacks, and that enemy dies, the unit will not advance to attack other enemies outside activation distance range - again, the same as an archer's behaviour.
      • Has Long Range Eyesight - Short sighted monsters can see 22 world units and longsighted 28, however this allows your unit to see enemies up to 38 world units away.
      • Double Click Selects By Mons Type - Standard myth behaviour is that when you double-click on a unit, all nearby units sharing the same collection tag will be selected. You can click on a dwarf, and the nearby pathfinder dwarf, dwarf hero, and screaming iron assault dwarf will also be selected. This value means that double-click will only include this unit if the clicked unit shares the same monster tag. I've seen plenty of instances where a large collection was duplicated purely to achieve this effect.
      • Missile Attack Not Height Affected - With Myth 2 Bungie introduced the concept of a flexible maximum range for missile units. You think your archers can only shoot 20 world units? Wrong. Put them on a high hilltop, and their range can extend significantly depending on how low the enemy is. It works the other way as well, the lower you are the closer you have to get to a high target before you can shoot. In TFL this was not the case - maximum range was maximum range. With this value your units will not gain or lose distance because of terrain elevation.
      • No Flinch When Healed - This means that while being healed a unit will keep doing whatever it was doing rather than freeze in the flinch position while the healing takes place.
      • Chases Enemy During Attack Recovery - Imagine if you will, a warrior chasing a dwarf. The warrior catches him, swings, then stands to think for a second before resuming the chase. Units with this value will not stand to think but will keep on chasing. This can make for more fluid and natural-looking gameplay, and also make you think twice before getting in range of the enemy as it is harder to get away again.
      • Walks on Surface of Water - These units will stick to the surface of water, making ripples as they move. You can define them to have no passability on ground, effectively making a boat unit. (Enter zero in the speed field for all land terrain types).
      • Doesn't Auto-target Enemies - With this flag, units will only attack an enemy if you tell them to do so. Conceptually having zero values for Warning and Activation would do this, however on occasion the unit still auto-targeted. Not with this flag on.
      • Extra Aggressive (Missile Units Only) - Imagine if you will a group of archers you've told to attack some fleeing arcs. The target you clicked on dies. Your arcs auto-switch to another arc in the enemy group, but they cease chasing - as soon as the new targets are out of range your arcs stop firing. This flag will make your arcs keep up the chase once you've told them to attack, until you give another command.
      • Adjust Block Rate - If you wish to adjust the rate of blocking as the name implies, check this flag. This will only work if the monster has a Blocking sequence set.
        • Block rate delay modifier - Modifies the delay between the monster's blocks. ( 1.0 equals default blocking delay)
      • Moves to Position to Shoot Uphill - The Myth targeting algorithms weren't fully complete for units shooting zero-gravity projectiles like bullets. One of the quirks happened if Myth decided that terrain was blocking the shot, as often occurs if the target is uphill from the attacker. When this happened, the attacker would stand still doing absolutely nothing. With this flag it will try to find a path to a position from where it can actually shoot.
      • Shift-Click Targets Group - If you hold shift while telling soulless to fire at an enemy group, the whole group will be targeted rather than only the clicked-on unit.
      • Walks Around Large Unit Blockages - Units become more intelligent about finding their way around lots of units to where they're going, rather than mindlessly walking back and forth going nowhere.
      • Can Target Flying Units *1.7.0* - This used to be broken. Now it will allow a unit to attack units marked as "flying".
      • Chases Enemies Intelligently - Due to quirks in the pathfinding algorithm its possible to shake a pursuing enemy off your tail by doing sharp zig-zags at the right moment. In practice that made the enemy unit look rather dumb. With this flag checked, the zig zag will no longer work.
      • Responds to Enemies when attacking - Normally when a unit is told to attack an enemy with other enemies in the way, this unit will die or at least get injured by the time it reaches its target. With this flag, it will give up on its target and attack the closer enemy instead, like in TFL.
      • Custom Experience Limit - Each time a unit scores a kill (shield/skull in Status Bar), depending on other settings, it can attack faster and more accurately. The default max limit is 5 kills for regular Myth. After that the unit cannot get any better. If you rather give a monster a different limit, check this flag.
        • Max. Experience - A value of 1 - 255 can be placed here. Don't worry if the value changes to a different value with a negative sign. It will still be the value you placed.

objects (obje) Image: Object Editor
Objects contain many of the physical characteristics of an object. For units, they determine health and vitality, just as they do for any other objects. They also allow you to edit their weaknesses and vulnerabilities.

object Tag Anatomy

  • Gravity - This number determines the downward acceleration of an object. It is measured in World units per tick squared--a tick is one thirtieth of a second, so just multiply the number by thirty to get the value in World units per second squared.
  • Terminal Velocity - This value is, when used correctly, the maximum downward velocity that an object can achieve. This only works under certain circumstances, so pay attention. If a unit's Z (vertical) velocity is less (that's right, less... projectiles can have negative velocities) than its terminal velocity, gravity will no longer accelerate it. This is used by parachuting dwarves and could conceivably be used for any projectile. Just make sure that your terminal velocity is negative too.
  • Elastic Coefficient - This value is used to determine how much velocity an object retains after impacting with another object. 1.00 is fully elastic, which means the object will retain all of its velocity, while 0.00 means the object would simply stop after colliding, maintaining none of it's velocity.
  • Max Vitality - These numbers are used to determine a unit's maximum health, which is randomly selected from between the two values. If you want a constant health, input the same number in each field.
  • Scale Fraction - This is the fraction by which an object's sprites are scaled (to create the appearance of larger size). Trow, for example, are scaled between 1.50 and 1.60 in order to make them tower over smaller units.
  • Minimum Damage - This is the minimum amount of damage that the object will recognize. Damage amounts less than this will inflict no damage on the object--its vitality will not decrease. This is to prevent such occurrences as weakening a tree with explosives, and then felling it with a single arrow or tossed rock.
  • Draw Selection Box - If this is checked, the object can be selected when it is clicked on, causing a selection box to be drawn around it.
  • Draw Vitality Box - If this is checked, the object's health will be displayed in a bar beside it.
  • Maintains Constant Height Above Mesh - If checked, the object will cruise at a level altitude over the mesh. This is demonstrated by a warlock's fireball.
  • Ignore Model and Object Collisions - If this is checked, the object will be ghostly, moving through models and other objects. This is used by gas effects like cloudkill.
  • Object is Solid - For Scenery this is already an option and for monsters it's assumed, however this also allows projectiles to be considered solid. Units will pathfind around them rather than walk through or over, and other projectiles will bounce off.
  • Object Can Not Be Deflected - This stops a projectile from being deflected the way it would on certain situations near steep areas. An example of this deflection is on Venice. Move a Warlock on one of the ramps near the center of the map. Move the warlock to one of the corners of the ramp and attack the ground or a unit inside the enclosed area. If done right, the fireball will arc upwards and not harm the target.
  • Object Ignores Area of Effect Damage - If checked, area of effect damage will not affect this object.
  • Object Not Accelerated by Damage *1.7.0* - If checked, makes a projectile unable to be accelerated by damage but will still take on damage.
  • Effect Modifiers - These fractions control how much damage a unit takes from any given type of damage. 1.00 is normal damage. 0.00 is no damage (i.e. immunity). Anything in between is a fraction of the damage a unit would normally receive. In cases where a given damage type does not inflict damage (i.e. paralysis and confusion), the number indicates how long the unit is affected by the malady.

observer constants (obpc) Image: Observer Constants Editor
The observer constants tag (and there should usually only be one) is a set of constants that are used to control the physics of the player camera. All seven buttons lead to a similar dialogue, which will be explained once for all options.

observer constants Tag Anatomy

  • Constants Dialog (un-named) - The Positive and Negative sections refer to opposing directions (forward and backward, left and right).
    • Maximum Velocity - This is the maximum speed the camera can attain in this direction.
    • Acceleration - This is the rate at which the camera builds up to its maximum velocity.
    • Deceleration - This is the rate at which the camera returns to rest.
  • Parallel Velocity - This represents the forward and backwards motion of the camera.
  • Yaw Velocity - This represents the turning motion of the camera.
  • Orthogonal Velocity - This represents the straight left and right motion of the camera.
  • Pitch Velocity - This is no longer used... ignore it.
  • Vertical Velocity - This is no longer used... ignore it too.
  • Orbit Velocity - This represents the orbiting motion of the camera.
  • Zoom Velocity - This represents the in and outwards zooming of the camera.

particle systems (part) Image: Particle Systems Editor
Particle systems contain the information Myth II uses to generate its particle based weather effects, such as snow or rain (though it can do anything from drizzle to rain chickens).

particle system Tag Anatomy

  • Collection Reference - This is the collection reference that contains the sprites you want to use as your particles, such as raindrops, snowflake, or trow (if you're feeling really silly).
  • Sequence - This pop-up is for selecting the actual sequence within your collection to use.
  • Minimum View Distance - This is the minimum distance that a particle can be from the camera. This value prevents things like snowflakes from being too close and obstructing the camera's view.
  • Transparency Rolloff Point - This is the distance from the camera at which the particles begin fade into transparency.
  • Transparency Cutoff Point - This is the distance beyond which particles are completely transparent and invisible.
  • Maximum # of Particles - This is the maximum number of particles that can be on the screen at one time.
  • Scale - This fraction is the scale of the particles.
  • Box Width (in cells) - This is how wide and tall your particle system box is. A particle system works by creating a number of boxes on a mesh and tiling them side by side so that they always surround the camera. Wider boxes mean more particles and a slower mesh, but smaller boxes might result in a player seeing gaps in the rain/snow. The value is, surprisingly enough, measured in cells.
  • Box Top Height (in WU) - This is the elevation of the top of the boxes, where the particles originate. Very tall boxes mean more particles, but boxes that are too low will allow the player to see the particles appearing before his camera.
  • Box Bottom Height (in WU) - This is the elevation of the bottom of the box; the point at which particles are deleted. Low bottoms always ensure that the particles reach the ground (they look odd when they don't), but mean that each particle will be tracked longer and slow the mesh down a bit more.
  • Max. Splashes Per Cell - This is the maximum number of splashes this particle system can cause per cell.
  • Time Between Building Splashes - This is the actual time between the building of each splash effect on the surface of the media being affected by this particle systems. Longer times mean raindrops will cause splashes less frequently, but smaller times can result in splashes bunching up and overlapping each other, which is rather ugly.
  • Boundary Conditions - These mysterious fields allow you to vary the amount of snow or rain the different parts of your mesh receive. Each field is a fraction that determines the base intensity of the system on that edge of the mesh--placing a 1.00 on the top means that it snows with full intensity in the north section of your map, while placing a 0.00 in the left and a 0.50 in the right fields result in no snow and half snow in the west and east sides of your map, respectively.
  • Velocity Ranges
    • I - This random range determines the X (east-west) velocity of the particles. Their velocity is randomly selected from between these two numbers.
    • J - This random range determines the Y (north-south) velocity of the particles. Their velocity is randomly selected from between these two numbers.
    • K - This random range determines the Z (up-down) velocity of the particles. Their velocity is randomly selected from between these two numbers. For most systems, you should make sure this random range is firmly in the negative, or you'll have strangeness like particles traveling up.
  • Ambient Sound - This is the ambient sound to be played while this particle effect is in effect--for example, rain only plays its ambient sound when it is raining, not when it is calm.
  • Splash Local Projectile Group - This is the local projectile group created when particles land in media (they are simply absorbed when they land on non-media).
  • Flags
    • States last indefinitely - If this is checked, the system starts in the Snowing State (see below) and stays that way forever.
    • Does not affect projectiles - If this is checked, the particles in this system do not affect other projectiles. For example, rain or snow would not douse burning objects.
    • Transparency varies with distance - If this is checked, the further away from the camera they are, the more transparent they become. Handy for adding depth to your particle system.
  • Not Snowing State
    • Duration - This is the duration of this state in seconds. The time the system remains in this state is randomly selected from between the two numbers.
    • Intensity - This is the intensity of the particle system while it is at this state. The number is a fraction--1.00 is full intensity, which means the maximum number of particles is used, while 0.50 is half intensity, and 0.00 is completely off. The number is randomly selected from the given range.
    • Transition Duration - This is the duration of the transition from this state to the next. Very long values here result in very gradual changes, while very short values result in the rain or snow stopping very abruptly.
  • Snowing State
    • This state and its settings are identical to the Not Snowing State, except that the ambient sound is played during this state. Generally, your intensity should be greater during this state than during the not snowing state.

preferences (pref)
Preferences contain Myth's user preferences information. Fear does not edit these, but don't despair, the Myth II Preferences dialog does a very nice job of it on its own.

preloaded data (prel)
I was told that I don't need to know about these, and closely watched as I quickly departed the room. I think I'm close to something.

Unlike dialog string lists, I suspect that these do have something to do with mind control lasers and orbital mirrors. The truth is out there.

projectile groups (prgr) Image: Projectile Group Editor
Projectile groups are just what they sound like--groups of projectiles. Instead of calling projectiles, Myth often calls the very versatile projectile groups instead, allowing for more varied explosions and effects. It might be useful to read the section on projectiles first, however.

projectile group Tag Anatomy

  • Mesh Effect - This pop-up allows you to select the mesh effect tag associated with a projectile group.
  • Sound - This pop-up allows you to select the sound associated with a projectile group.
  • Local Projectile Group - This pop-up allows you to select the local projectile group tag associated with a projectile group. This allows for such effects as smoking bodies, or things like a fetch's escaping soul.
  • Projectile List (un-named) - This list allows you to add, delete, and duplicate projectiles in a projectile group. Double clicking on a projectile brings up the Projectile window.
  • Projectile Window (un-named)
    • Projectile - This pop-up allows you to select the projectile.
    • Count - These numbers allow you to select the volume of projectiles. The number of this type of projectile in this group is randomly selected from between these two numbers. If you want a constant number of this projectile, enter the same number in both fields.
    • Position - This number is a percentage that dictates where on the sprite of the calling object this projectile will appear. This is great for things like body parts, which must appear in certain places on the unit's body. 1.00 is the top of the unit, 0.500 is the middle, and 0.00 is the bottom of it. The number is a random range, which means the projectile will appear at a position between the two values.
    • Appearing Fraction - This is the chance that this projectile will appear, 1.00 being a 100% chance, while 0% is no chance of it appearing.
    • Alternative Projectile *1.7.0* - This pop-up allows you to select the alternative projectile that will get created if the primary projectile does not get created. Say the Appearing Fraction was set to 0.600. This means there is a 60% chance of the primary projectile getting made, and a 40% chance of the alternative projectile getting made instead.
    • Flags
      • Is Central - If checked, this projectile will be at the very center of the group.
      • Is On Ground - If this is checked, the projectile will appear on the ground beneath the group.

projectiles (proj) Image: Projectile Editor
Projectiles are one of the most amusing, and complex, objects in Myth II. This tag contains almost all the data needed to create a huge range of projectiles, and are used by all units (among other things) for attacks and other effects.

projectile Tag Anatomy

  • Collection - This pop-up allows you to select the collection (sprites) tag used by this projectile.
  • Object Tag - This pop-up allows you to select the object tag that contains the projectile's physical characteristics.
  • Lightning Tag - This pop-up allows you to select the lightning tag for lightning behavior characteristics.
  • Artifact Tag - This pop-up allows you to select the artifact tag that is associated with this projectile.
  • Local Proj. Group - This pop-up allows you to select the local projectile group tag used by this projectile.
  • Sequences
    • Flight - This pop-up allows you to select the in flight sequence.
    • Debris - This pop-up allows you to select the debris sequence.
    • Bounce - This pop-up allows you to select the bouncing sequence.
  • Detonation
    • Tag - This pop-up allows you to select the projectile group called when this group explodes.
    • Target - Still no idea what this does... Originally this did nothing. When too many projectiles are being created, Myth stops creating new projectiles before reaching the projectile limit. If this is set to anything other than "No Tag", this projectile will have priority over others that don't have this set to anything. Useful if there are some very important projectiles that should always be created in a map that is likely to reach the projectile limit.
    • Splash/Rebound Type - This is for setting the splashing and rebounding effect of a projectile. It is cosmetic setting that doesn't really affect anything except the projectile's appearance, so set it accordingly.
    • Normal Frequency - This is the chance that a projectile will detonate on contact with a non-media surface. 1.00 is every time, while 0.00 is never.
    • Media Frequency - This is the chance that a projectile will detonate on contact with a media surface, like water. 1.00 is every time, and 0.00 is never. Very handy for such things as grenades.
    • Velocity - This value is the random velocity given to particles created by the detonation of this of this projectile.
    • When Animation Loops - If this is checked, the projectile detonates when its animation sequence loops.
    • When Transfer Loops - If this is checked, then the projectile detonates when its transfer (fade in, fade out, etc.) loops.
    • At Rest - If this is checked, the projectile detonates when it comes to rest.
    • Remains After Detonation - If this is checked, the projectile remains after it has detonated. Hmm, perma-pus packets, anyone?
  • Contrail
    • Tag - This is for selecting another projectile to be used as the projectile's contrail. The most frequent example of this is bits of gore--an arm or leg will have "guts blood" selected so that it drips blood as it flies. When some creativity, this can be used to create some astounding special effects.
    • Ticks Between Contrails - This is the amount of delay between contrail sprites (like the puffs of a grenade).
    • Maximum Number - If checked, the number entered will determine the maximum number of contrails the projectile will generate. If unchecked, the projectile will have an infinite number of contrails.
    • Initial Frequency - This is the frequency at which a projectile emits contrails when it is first created. 1.00 is the maximum, and 0.00 is the minimum.
    • Final Frequency - This is the final frequency at which a projectile emits contrails. Over time, the frequency moves from the initial to final, decreasing the volume of contrails. For example, an arm bleeds most profusely at the beginning of its flight, but eventually tapers off.
    • Frequency Change Per Tick - This is how much the contrail frequency may change per tick. This value will be randomly added or subtracted to the initial value every tick, resulting in some variation in an otherwise smooth contrail.
    • Frequency Resets After Bouncing - If checked, the projectile's contrail frequency will reset after bouncing.
  • Physics
    • Volume - This allows you to select the volume of a projectile. This is used to determine who can pick which projectiles. Ghols, for example, pick up and throw Small projectiles.
    • Inertia - This number is actually backwards--an object with a small number here has greater inertia, and thus is accelerated less by explosions and other such things, like ghol arms. A projectile with inertia of 1.00 is very light and easily affected, while one with an inertia of 0.10 is very heavy and hard to move.
    • Random Initial Velocity - This number is the random initial velocity of a projectile.
    • Use Acceleration Values - With this checked, projectiles may also be detonated by how fast they are accelerated rather than by how much damage they receive. This is how TFL projectiles worked, and these values bring the TFL options into Myth 2.
      • Max. Safe Acceleration - the maximum amount of acceleration the projectile can receive before it is a chance of detonating.
      • Accel. Detonation Fraction - The chance of detonating when accelerated beyond the safe amount.
    • Affected By Wind - If checked, this object is affected by the wind present in meshes with wind tags set.
    • Cannot Be Accelerated - If this is checked, the projectile cannot be accelerated by external forces, such as wind or explosions. However, a side effect of this flag is that the projectile can't be damaged by other attacks. If you want the projectile to be susceptible to damage without being able to accelerate, use the "Object Not Accelerated by Damage" object tag flag instead.
    • Melee Attack - If checked, this attack is a melee attack, and will be considered as such.
  • Promotion
    • Projectile Tag - This is the projectile tag that this projectile can be promoted into.
    • Group Tag - This is the projectile group that this projectile can be promoted into.
    • Unit Tag *1.7.0* - This is the unit that this projectile can be promoted into. The unit must be in the map's list of units for the team that owns this projectile (use Loathing for this). The unit will only be created on terrain its monster tag has enabled, and if the projectile is not too high above the ground when trying to promote. If you want the unit created on terrain it can't walk on, simply enable that terrain and make that terrain speed 0.00. Otherwise, the unit is killed instead of created.
    • Promoted on Detonation Fraction - This is the chance that a projectile will be promoted on detonation. 1.00 is every time, 0.00 is never.
    • Promoted at End of Lifespan - If this is checked, the projectile is promoted when its lifespan expires.
  • Class - This pop-up is used for selecting a projectile's class. In most cases, this actually does not matter--the body part classes were supposed to be used for things like scripts, which never made it into Myth. However, to be on the safe side, set your projectiles accordingly.
  • Sounds
    • Flight Tag - This is the sound that the projectile plays while in flight.
    • Rebound Tag - This is the sound that the projectile plays when it rebounds.
  • Animation Rate - This is the rate at which a projectile's animation plays through. Smaller numbers are faster--most stay at 1.00, which is the normal animation speed, while some slow down over time to 3.00 or 4.00, as a dwarven cocktail does.
  • Lifespan - If checked, the projectile has a lifespan that is randomly selected from the range of numbers supplied. The range is in seconds--1.00 to 3.00 means the projectile will live for 1 to 3 seconds. If unchecked, the projectile is essentially immortal (until it detonates).
  • Delay - This range is the delay between the time that a projectile is created and when it is visible (I think).
  • Nearby Target Radius - This number is used to determine possible range of side-effect attacks, like a fetch's lightning arcing off and hitting a nearby unit, or a shade's dispersal dream attack.
  • Exclude Nearby Target Radius - This number is used to determine the range to exclude for side-effect attacks near this projectile when using "Nearby Target Radius". This way you can make a side-effect attack target units that are not so close and leave the units closest to this projectile untouched.
  • Tracking Priority - This is the importance of this projectile to the camera--the more important the projectile, the more likely it is to be focused on by the automatic camera. For example, a wight's blast has a priority of 255--when the camera is in Automatic Mode, it will always zip over to watch a wight explode, because 255 is the highest priority. Use this wisely, though--if all of your projectiles are top priority (255), it becomes rather pointless. Don't do that. Just don't.
  • Guided Turning Speed - This is the speed at which a guided projectile can turn.
  • Damage (window)
    • Type - This is the type of damage being inflicted by this particular projectile. This is important because many units are invulnerable or take less damage from certain damage types, so you should choose damage accordingly.
      • NONE - This is, appropriately, no damage.
      • Explosion - This is explosive damage. Explosive damage does not cause a unit to bleed, and always causes a unit to suffer a hard death (i.e. turn into chunks).
      • Magical - This damage type causes units to disintegrate into little chunks.
      • Holding (i.e. shocking) - This damage type doesn't actually damage a unit--instead, a unit is held in place for a period of time equal to the amount of "damage" inflicted-- one point of damage is equal to one second of immobility. Impacts of this type always call the internal effect projectile group, which is currently (and should be left) blank.
      • Healing - This damage type actually causes a unit to be healed. It, like holding, always calls the internal healing effect projectile group, which is the familiar journeyman healing effect.
      • Kinetic - Damage of this type, caused by fast moving objects, is pretty much ordinary damage.
      • Slashing Metal - This damage type causes a unit to bleed on impact, but not much else.
      • Stoning - No, it doesn't leave a unit wandering around in a daze... stoning causes a unit to be turned into stone, essentially paralyzing it forever. Nasty thing.
      • Slashing Claws - Just a variation of slashing metal.
      • Explosive Electricity - This is the damage inflicted by lightning, which chars bodies and turns them into little chunks.
      • Fire - Fire damage does not cause units to flinch or bleed, just steadily sucking away health until the unit collapses in a charred heap.
      • Gas - Gas is like fire, but does not char the unit. Instead it causes soft deaths. It is worth noting that few, if any, non-unit objects are affected by gas damage.
      • Charm - This special damage type doesn't inflict damage at all. Instead, it causes the controller of the unit that created this projectile to gain control of an enemy unit damaged by this projectile. This is used by The Deceiver's charm spell.
    • Damage - This range determines the amount of damage this projectile does. If you want it to inflict a set amount of damage, set both fields to the same value. Otherwise, the value is selected at random from between the two.
    • Radius - This range determines the radius of the projectile's area of effect. Explosions should have large areas, while impacts (by swords, arrows, etc.) should have small or nonexistent radii.
    • Rate of Expansion - This is the speed with which a projectile's damage fills its radius. Alternatively, the speed at which a shockwave departs its epicenter.
    • Damage to Velocity - This is the fraction of damage inflicted by this object that is converted into kinetic energy acting upon an object within its area of effect (whew). Basically, if there is a value here, a portion of the damage this explosion (or whatever damage type it is) inflicts on a chunk of debris will be changed into motion. 1.00 is equal speed to damage, while 0.00 is no speed. You can go faster than 1.00.
    • Damage Flags
      • Proportional to Velocity - If this is checked, an object does more damage the faster it is moving. This is great for things like sharp or hard debris, which can be tossed by ghols or accelerated in explosions, which can sometimes bring them to lethal speeds...
      • Area of Effect - If checked, this projectile has an area of effect.
      • Does Not Interrupt Events - If this is checked, then the damage caused by the projectile does not interrupt other events, like another unit's attack.
      • Cannot Be Healed - If this is checked, damage inflicted by this projectile cannot be healed later.
      • Can Cause Paralysis - If this is checked, the projectile causes any unit it damages to be paralyzed.
      • Can Stun - This doesn't appear to do anything...
      • Cannot Be Blocked - Projectiles with this flag set cannot be blocked by a unit.
      • Does Not Affect Monsters - If this is checked, the projectile will not affect units of any type.
      • Detonates Explosives Immediately - Projectiles with this flag cause explosives to explode if they are close by. An example is a fetch's lightning--for laughs, stand a fetch on top of a pile of satchel charges and tell it to shoot something. Boom.
      • Proportional to Mana - If this is checked, the amount of damage inflicted is proportional to the amount of mana spent on the attack. This is not true, this flag makes the attack use up all the unit's mana.
      • Can Destroy Large Objects - If this is checked, the projectile can destroy large objects. Generally, only things like powerful explosives or things like Trow kicks should have this flag set.
      • Instantaneous - If this is checked, the damage caused by a projectile does not spread to fill its area of effect--it simply fills that area instantly.
      • Cannot Hurt Owner - If this is checked, the projectile cannot damage the unit that owns it.
      • Does Not Make Monsters Flinch - If this flag is checked, the projectile will not cause units to flinch when they are affected by it. Nice for subtle things, like gas attacks.
      • Can Cause Confusion - If this is set, the projectile will cause any unit it damages to become confused.
  • Projectile Flags (window)
    • Uses Owner Color Table Index - Objects with this flag checked use certain colors that belong to their owners. This creates such effects as colored flights on arrows, netgame balls, and appropriately colored body parts.
    • Can Animate Backwards - Projectiles with this flag set can, and will, sometimes run through their animation sequences in reverse, creating a bit more diversity in motion.
    • Can Be Mirrored - If this is checked, then the projectile's sprites can be mirrored (flipped) in order to provide a varied appearance.
    • Becomes Dormant at Rest - Projectiles with this flag become dormant when they come to rest, but don't disappear. Body parts and netgame balls are examples of these sorts of projectiles.
    • Animates at Rest - If this flag is checked, then the projectile continues to run through its animation sequence even when it is at rest.
    • Bloodies Landscape - If this flag is checked, the projectile creates bloodstains on the ground upon impact.
    • Is On Fire - Projectiles with this flag are on fire--they have a burning contrail like flaming arrows and dwarf bottles, and are extinguished by water.
    • Passes Through Target - If this is checked, the projectile will continue moving even after it has hit its target.
    • Cannot Be Mirrored Vertically - If this is checked, the projectile cannot be mirrored vertically (in order to create more variety in the appearance of projectiles).
    • Floats - Projectiles with this flag checked float when they land on media.
    • Is Media Surface Effect - If this is checked, the projectile is (appropriately) a media surface effect. Examples of these are splashes.
    • Continually Detonates - Projectiles with this flag continually detonate. This can give the appearance of pulsing clouds, and create persistent areas of effect.
    • Is Lightning - If this is checked, the projectile is a lightning bolt, and uses characteristics as defined by its Lightning Tag.
    • Chooses Nearby Target - If this is checked, the projectile will randomly attack a new target inside of its Nearby Target Radius. The secondary bolts spawned by a fetch's lightning bolt do this.
    • Is Only Destroyed By Lifespan - Projectiles with this flag checked persist until their lifespan expires. This is handy for things like clouds of gas or fire that remain even after injuring a unit.
    • Makes Owner Monster Visible - Projectiles with this flag will make the owner unit visible for the use of entrance projectile groups.
    • Can Set Landscape On Fire - When this flag is checked, the projectile can spark a fire upon hitting a combustible piece of landscape.
    • Centered on Target - Projectiles with this flag set are centered on their target when they detonate. This is used by such things as a Shade's dispersal dreams, which create a blast pattern radiating from the victim.
    • Marks Target As Having Been Chosen - If this is checked, then a projectile cannot hit a previously targeted unit again. Handy for limiting things like bouncing lightning and dispersal dreams.
    • Is Bloody (Do Not Draw) - Projectiles with this flag are considered "bloody", and are therefore not drawn when Myth is being played in No Blood mode. All pieces of gore should have this flag.
    • Is Guided - Projectiles with this flag are guided towards their target.
    • Detonates Immediately - If this flag is set, the projectile detonates immediately upon creation. This is used by such things as the wight's detonation.
    • Damage Proportional to Mana - The amount of damage inflicted is proportional to the amount of mana the unit had before using this attack. This flag will do nothing unless the "Proportional to Mana" damage flag in this projectile is checked.

recordings (reco)
Recordings are Myth II's saved film objects. These tags contain sequences of commands that the Myth II engine reads to create replays. Fear cannot edit these tags.

saved games (save)
Like recordings, saved games are internal tags used by Myth II to store game data, in this case the state of a saved game. Like recordings, these tags cannot be edited by Fear.

scenery (scen) Image: Scenery Editor
Scenery tags contain much of the appearance and behavior data for Myth II's scenery objects.

scenery Tag Anatomy

  • Collection - This pop-up allows you to select the sprite collection tag used by this scenery object.
  • Projectile - This is the projectile that this object is transformed into when it becomes airborne. This is most often used by netgame balls.
  • Object Tag - This pop-up allows you to select the object tag that defines a scenery object's physical characteristics.
  • Model Permutation Delta - Woo boy, brace yourselves for this one... A scenery object with the right flags set (see below) can, when destroyed, adjust to this value the permutation of a model occupying the same mesh cell. This is how effects such as destructible model walls are achieved--by placing a scenery object in the same cell as that model and setting the permutations correctly. If you are playing with this, you are operating above and beyond the scope of this documentation. Be careful out there.
  • Scenery Projectile Groups (window)
    • Impact - This is the projectile group that is created when something collides with the scenery object. Dust is a common example, and you might make it so that trees emit leaves when impacted.
    • Detonation - This is the projectile group that is created when this object explodes. Fragments and pieces of the object are most commonly used here.
  • Scenery Collection References (window)
    • Collection Reference - This allows you to select the scenery color reference used by this scenery object. This is handy for things like variations in color without altering the sprite itself--very useful for creating night variants of common things.
  • Scenery Sequences (window)
    • Undamaged - This is the sequence used by the scenery object when it is undamaged.
    • Ruined - This is the sequence used when the object is damaged and ruined.
  • Netgame
    • Is Netgame Flag - If this flag is checked, the scenery object is considered to be a netgame object (flag or ball), and the following Netgame options become visible.
    • Scoring Type - This is the type of game that this scenery object is used in and loaded into.
    • Flag Number - This is the number assigned to this flag or ball, which is important for such games as Flag Rally or Scavenger hunt. Otherwise, the number should be set to 0, as it is for Territories, Captures, Last Man, etc.
  • Scenery Flags
    • Is Solid - Scenery with this flag checked are solid objects that can interact with units, projectiles, and other objects.
    • Has Random Facing - If checked, this scenery will be facing in a random direction, as determined by its sequences. This randomizes scenery when it is placed, and helps greatly with visual variety since all scenery faces one direction during a game.
    • Is Large Object - If this is checked, then only projectiles with the flag Can Destroy Large Objects can destroy this scenery.
    • Respects Monster Visibility - If this is checked, then this scenery object will fade out when no units are in range, just as an enemy unit would.
    • Adjusts Model Permutation - If this is checked, this scenery object changes to the Model Permutation Delta the permutation of a model occupying the same cell.
    • Animates - If this is checked, then the scenery animates its sequence instead of using a static, random frame.
    • Marks Terrain Impassable - If this is checked, the scenery marks as impassable the terrain directly beneath it. This makes objects like trees impassable, and helps unit pathfinding.
    • Affects Model Animation Frame - If this is checked, the destruction of this scenery object causes any model animations in the same cell to advance one frame.
    • Destruction Starts Model Animation - If this is checked, the destruction of this scenery object causes any model animations in the same cell to start.

sound lists (soli) Image: Sound List Editor
Sounds lists are just that--lists of sounds used by the engine in lieu of many separate sounds.

sound list Tag Anatomy

  • Sound List (un-named) - This list allows you to add, delete, and duplicate sounds on the list. Double clicking on a sound brings up a small window that allows you to select the entry's sound tag.

sounds (soun) Image: Sound Editor
Sounds are used extensively by Myth II to create an aurally detailed environment, complete with random, ambient, narrative, and event sounds. Sounds tags contain the sound data for these sounds, as well as several of their behavioral characteristics. Aside from being fairly simple, sounds are an awful lot of fun. Try changing the pitch of your berserks' voices for an amusingly tenor chorus of battle cries.

sound Tag Anatomy

  • Loudness - This is used to control the basic volume of a sound. Most sounds are flagged as Normal, while ambient and random sounds are often Quiet. Explosions usually occupy the Loud setting, and the Narration setting is for messages of dire importance, such as netgame warnings or in game dialogue.
  • Subtitle String List - This is for selecting the string list to use as a subtitle--the chosen string is written at the bottom of the screen for the benefit of those unable to hear the message.
  • Subtitle String - Once you have the Subtitle String List set to what you want, you can use this to select which specific string from that string list tag you want for this sound.
  • Play Fraction - This fraction is the chance that this sound will be played when it is called. 1.00 is, as usual, always, and 0.00 is never.
  • External Frequency Modifier - This fraction modifies a sound's frequency. For example, a berserks' attack order sound has a setting of 1.00, so this sound is played every time the berserk is order to attack. A setting of 0.50 means it will be played half the time, and 0.00 is never.
  • Pitch - This range affects the pitch of your sounds. A pitch of 1.00 is unchanged, while a pitch of 2.00 is twice as high, and a pitch of 0.50 is twice as low. The value is randomly selected from between this range. Try setting both values to 1.75, and live the dream of commanding a troop of chipmunks.
  • Volume - This range affects the volume of your sounds when they are played. 1.00 is again unchanged from the original sound, while 2.00 is twice as loud, etc.
  • Permutation Flags
    • Cannot Be Restarted - If this flag is set, the sound cannot be broken off and restarted--this sounds really bad for explosions and voices, or most sounds for that matter.
    • Can Occupy Multiple Channels - If this is checked, this sound can be played simultaneously in multiple channels. Great for sounds like sword blows and body impacts, which often occur in numbers during a melee.
    • Cannot Be Obstructed By Media - If this is checked, then the sound will not be muted when it is played under media.
    • All permutations use the same subtitle - If this is checked, all permutations use the same subtitle string.
    • Stopped when source disappears - If this is checked, a sound will stop immediately if the source disappears. Good for things like ambient sound, bad for things like explosions.
  • Permutations - This list allows you to add, duplicate, and delete a sound's permutations. A permutation is randomly selected when a sound is called, which allows for a greater diversity of sounds (witness the several battle cries of many units). Double clicking on a permutation brings up the Permutation Edit window.
  • Permutation Edit (window)
    • Name - This is the name of the permutation.
    • Skip Fraction - This is the likelihood that this permutation will be skipped when this sound is called, and a permutation is randomly selected.
    • Import/Play - These buttons allow you to import a 16-bit, 22 kHz AIFF sound, or play the current sound. Be sure to import the right sound type, or you might wind up with odd results.

string lists (stli) Image: String List Editor
String lists are very basic tags that nevertheless contain a stunning amount of the information that Myth II uses. The editor is very simple--just a text window that you can input strings into. Strings are separated by means of line breaks (a return character, just a new line). Type in one string per line, and if your string is longer than the line, let the editor window automatically wrap it to the next line.

The only thing to watch out for is null strings at the end of your list. Be sure that when you finish typing, you cannot move the cursor beyond the end of your last string. If you can move onto the next, empty line, you should hit delete to erase that empty line, or Myth will consider it to be a string as well.

Often, you will see bold and italic text being used in strings. To change the type style, you need to enter |p, |i, or |b (those are vertical bars, or pipes) to switch the style to Plain, Italic, or Bold (respectively). These switch characters (which are just two separate characters) will be invisible in the game, but will alter all text following them. Myth I players will note that this has changed from Myth I, which used \b, \i, and \p to change text styles.

templates (temp) Image: Template Editor
Templates tags contain the templates for Myth II's map actions. Since these require (and are tied to) hard coded map actions in the Myth II engine, tampering with them is a bad idea.

text (text) Image: Text Editor
Text tags are like string tags, except that returns/line breaks are not used to separate lines into strings. Text tags are used for such things as level narrations, and are just as easy to edit as string list tags. Simply open the tag, and type away.

units (unit) Image: Unit Editor
Unit tags are extremely simple tags that tie two components together to make a single new unit. Units, not monsters, are what are called by meshes and most other things in the engine--monsters are the data used by those units only. If you create a new monster tag, be sure to create a new unit tag to go with it.

unit tag Tag Anatomy

  • Monster - This pop-up allows you to select the monster tag that defines this unit's characteristics and behavior.
  • Collection Reference - This pop-up is for selecting the unit's collection reference, which defines its colors in many situations, including the solo game. This allows minor variations of units, such as night units, without requiring the creation of entirely new monster tags and collection tags.

wind (wind) Image: Wind Editor
Wind is a subtle invisible force that acts on projectiles in a mesh with a wind tag.

wind Tag Anatomy

  • Time Between Adjustments - This range is the number of seconds between adjustments to the wind velocity.
  • Maximum Adjustment per Tick - This is the maximum amount that a velocity component can change per adjustment. Large values here and small values in the "Time Between Adjustments" can result in some pretty chaotic wind patterns.
  • Wind Velocity
  • I component - This is analogous to the X component of the wind's velocity. The velocity of the wind in a West/East direction is randomly selected from this range.
  • J component - This is analogous to the Y component of the wind's velocity. The velocity of the wind in a North/South direction is randomly selected from this range.
  • K component - This is analogous to the Z component of the wind's velocity. The velocity of the wind in an up/down direction is randomly selected from this range.

Section IV: Some Other Miscellany Stuff

Tips and Advice
Here's where we get to really tell you how to screw things up.

Random Fear Tips

  • Start Small - I know, that Screaming Iron Assault Dwarf and his unmitigated capacity for devastation haunts your dreams, but it helps to start small when first playing with Fear. Make your dwarves throw satchel charges instead of cocktails first, so that you can get a better idea of how things work before you embark on a major project. If you try to do too much, you might find yourself in way over your head, and you'll have to fend off all sorts of bugs.
  • Avoid Bells and Whistles - Sound advice in daily life, but even better advice when playing with Myth. Sure, using a 500 particle local projectile group makes a really cool looking cloud of fog, but it will also slow down most older computers. Also, excessive use of wild special effects can cheapen your creation--after all, how many lightning shooting archers and Super Deluxe Mega Mages can one person stand?
  • Back Up Your Local Folder - Sure, you've heard this advice before. Back up, back up, back up. However, with Fear, it pays to keep a copy of your tags set aside when working, because of the way Fear automatically saves changes. If you really mess something up, you can't just hit Undo or decide not to save.
  • Get Rid of Your Local Folder! - Whoo, contradictions! Seriously, though, if you've been playing with tags that were included with Myth II, you should remove or rename your local folder before playing netgames or the solo game. Otherwise, you will run into errors as people on the battlefield see your glorious Stone Cold Ghol Shaman as just another ghol.
  • Too Much of a Good Thing - Myth has certain built in limits to the number of objects that can exist on a map. If you notice that your projectiles are vanishing, or your local projectile groups are no longer creating particles, odds are there are too many on the map. But remember: just because a local projectile group has run out of particles and is invisible doesn't mean it isn't still there.
  • No Limits - Often, you will see fractions that determine such physical things as inertia and energy conversion, especially inside of projectiles. These fractions are generally multiplied against another value, which means 1.00 will leave that value the same. We all understand that fractions range from 1.00 to 0.00, but keep in mind that you can go higher than 1.00... much higher. Throw a higher value into a projectile's Damage to Velocity attribute, and watch the debris fly!
  • Keep Track of Your Tags - When embarking on a particularly ambitious project, it helps to jot down which tags you will need in order to accomplish this. New units need new monster and unit tags, while more ambitious units might also require object, collection, collection reference, projectile, projectile group, sound, and several string list tags. And that's just the units. Knowing what you have left to do can be invaluable. Plan ahead.
  • Be Negative - If you're feeling particularly reckless, try substituting a negative value for some of the values you see in Fear. While this might cause all sorts of strangeness, the worst it can really do is cause Myth II to crash (save your work... you have been warned). Doing so can result in some useful results. For example, giving a unit a negative attack recovery time can result in some awfully fast attacks.

Special Thanks
A final thanks to a few people who helped in the creation of this guide.

Made Possible By:

  • Jason Regier - For patiently explaining all of the tags I couldn't figure out on my own.
  • Jason Jones - For explaining a few other tags, some Myth I stuff, and occasionally threatening to kill me.
  • Jonathon Haas - For explaining a few functions of Fear itself.
  • The Level Designers - For giving me a chance to play with some of these tags and actually call it "work."
  • The Badlands group - For testing these docs (and creating the Loathing docs, so that I didn't have to).
  • The Number 7 - Seriously though, what isn't?

Neither Bungie Software or Project Magma can provide phone-support for Fear or its documentation.
Any updates to this manual, or to Fear itself, will be made available via Project Magma's website.
Keep tuned to http://projectmagma.net for details.

Fear, Myth II, and content copyright 1998 Bungie Software Tyson (Ferrex) Green

Loathing Documentation Fear Documentation